使用Hexo 折腾静态网站并运行已有较长一段时间,一直没有整理关于此方面的搭建经验,最近得空就将本站的搭建过程以及平时的更新文章的方式写一写。嗯, 主要还是记录一下各种资源的白嫖姿势。
建站初衷 建站初衷是将自己学到的技术、知识或踩过的坑记录下来,从而加深印象。
同时,也会将看到的好文章进行转载,避免后面再次使用时到处查找。
内容以技术积累为主,也不排除会写一些生活方面或者其它主题的内容。
概况 本站是使用Hexo 搭建的纯静态网站。
需求
采用双线部署的方案
国外路线使用vercel
免费,可以自定义域名,全球CDN加速国内访问速度也不错,自动生成SSL证书。
现在已经被墙了。
国外线路使用 Netlify
免费,目前还没被墙。
国外线路使用 cloudflare
这个应该是目前最优的方案,由于种种原因本站未使用这个。
国内路线使用云开发CloudBase
每个腾讯云账号可以开通一个按量计费的云开发环境(费用相关FAQ 、免费额度 ),小站完全够用。
最重要的是CloudBase还支持备案,免费额度用完之后按量收费,小站一天几毛钱足矣。
以上方案在免费的同时也还有保持相当不错的访问速度。不需要购买服务器,减少不必要的运维工作。
白嫖图床 白嫖图床有很多,如:
本站为了能够方便管理图片资源,选用GitHub图床,配合jsdelivr做CDN加速。
具体白嫖姿势:利用GitHub做图床 。
添加一个动态页面 微信朋友圈已经被微商、房产中介、猎头顾问等广告信息充斥着,已经逐渐远离了熟人社交这个属性,需要找个清净的地方来发布碎片化想法,于是根据本主题进行进行改造,把动态页面加上,实现通过公众号或者IOS快捷方式发送动态到静态博客。
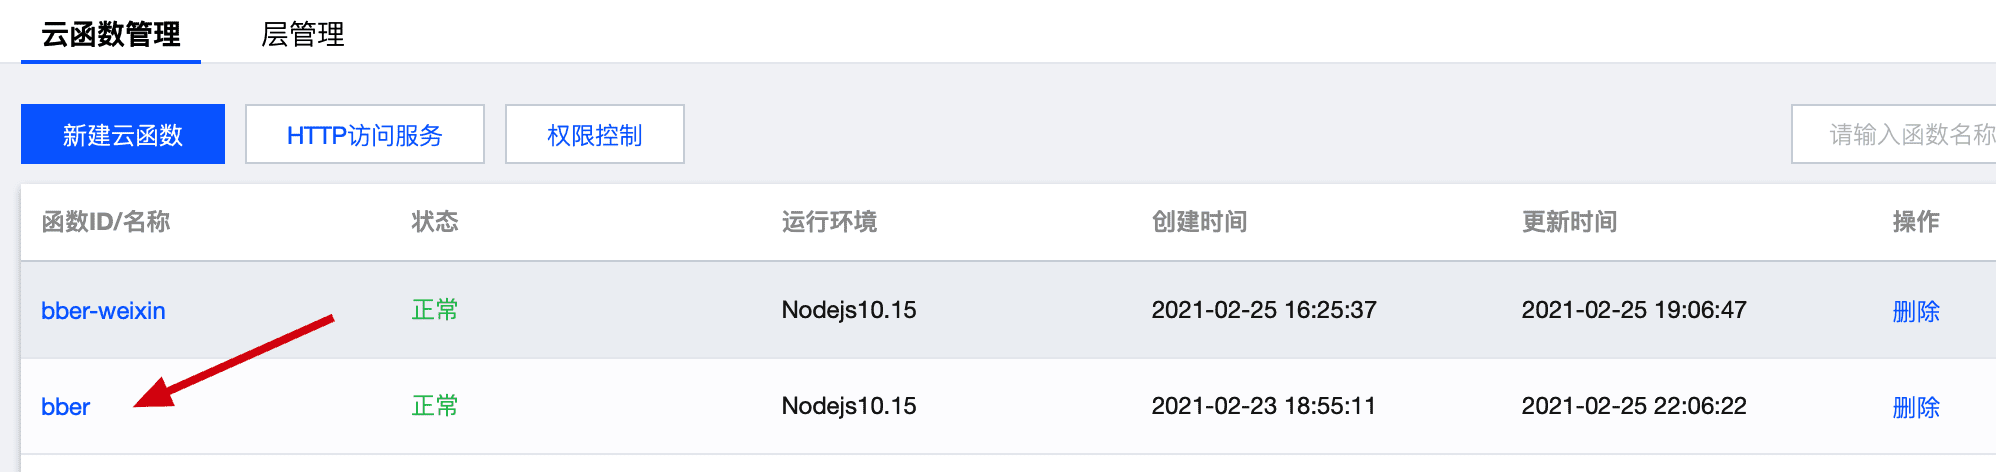
搭建动态页面的具体姿势可以参考这篇文章:使用个人公众号或IOS快捷指令发「动态」到hexo博客 ,该方法需要一个云开发 环境。
此方法的前提是已经成功在云开发中部署好bber云函数,具体参考使用个人公众号或IOS快捷指令发「动态」到hexo博客 。
第一步 添加动态 页面的渲染脚本 在themes/stellar/layout文件夹中新建一个talking.ejs文件。
themes/stellar/layout/talking.ejs <% function layoutTitle() { const title = page.h1 || page.title; if (title && title.length > 0) { return '<h1 class="article-title"><span>' + title + '</span></h1>'; } else { return ''; } } %> <script src="https://gcore.jsdelivr.net/gh/cayzlh/psychic-potato@master/js/ispeak-bber-md.min.js"></script> <article class='content md' > <%- layoutTitle() %> <div id='speak'></div> </article> <script> ispeakBber .init({ el: '#speak', // 容器选择器 name: '<%- theme.talking.name %>', // 显示的昵称 envId: '<%- theme.talking.envId %>', // 环境id region: '<%- theme.talking.region %>', // 腾讯云地址,默认为上海 limit: '<%- theme.talking.limit %>', // 每次加载的条数,默认为5 avatar: '<%- theme.talking.avatar %>', fromColor:'rgb(245, 150, 170)', // 下方标签背景颜色 默认 rgb(245, 150, 170) loadingImg: '<%- theme.talking.loadingImg %>', // 自定义loading的图片,示例值为默认值 dbName:'talks' // 数据的名称,默认talks,避免有人的命名不是这个,所以加入此配置字段。 }) .then(function() { // 动态加载完成后的回调函数,你可以写你自己的功能 console.log('动态 加载完成') }) </script> {% endfolding %}
第二步 在主题配置文件中配置云开发参数 在主题配置文件themes/stellar/_config.yml中为动态页面配置云开发参数,云开发参数的获取请参考云开发相关文档 。
themes/stellar/_config.yml talking: name: 🐳Ant丶 envId: 你的云开发环境ID region: ap-guangzhou limit: 5 avatar: https://gcore.jsdelivr.net/gh/cayzlh/git-img-repository@master/2021_04_22_144116190144811619014481546.gif loadingImg: https://gcore.jsdelivr.net/gh/cayzlh/psychic-potato@master/image/loading.gif
第三步 配置菜单 sidebar: menu: post: '[btn.blog](/)' wiki: '[btn.wiki](/wiki/)' talking: '[动态](/talking/)' more: '[更多](/about/)'
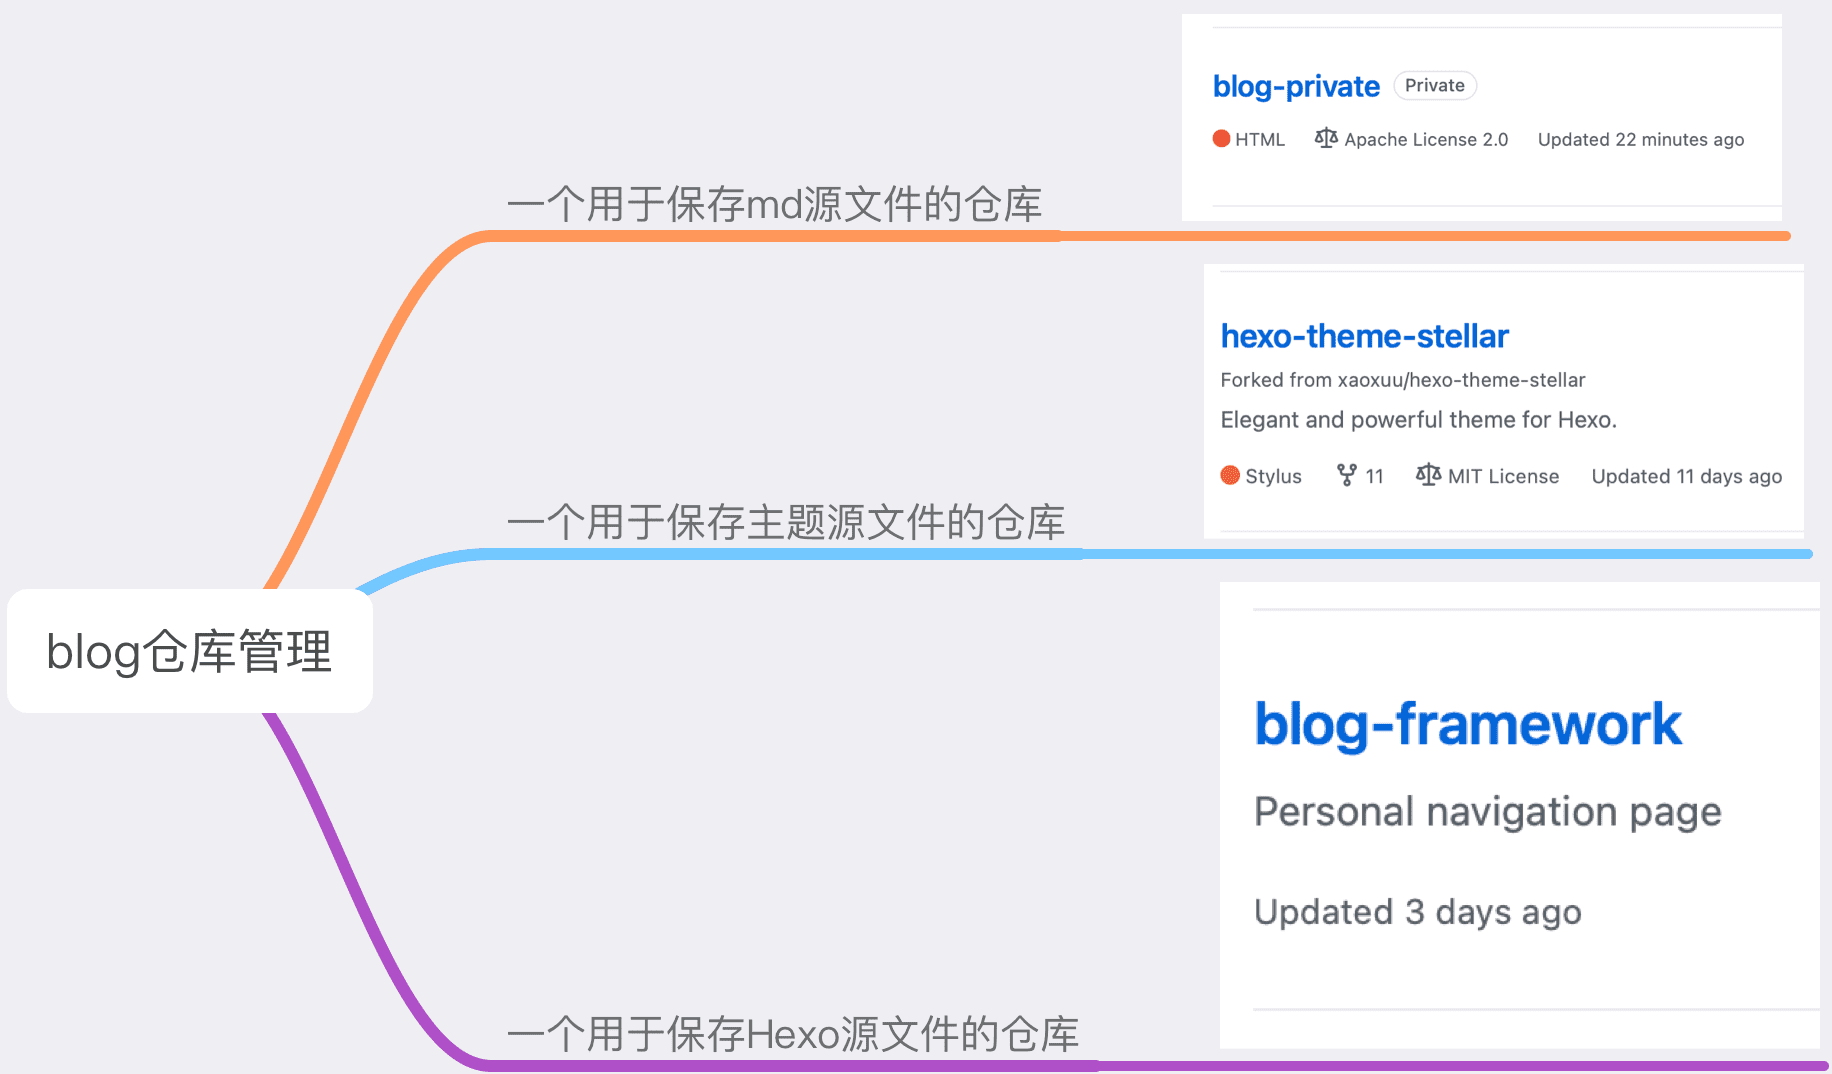
GitHub仓库管理 如何管理文章源文件、主题文件?
目前使用三个仓库来保存源文件:
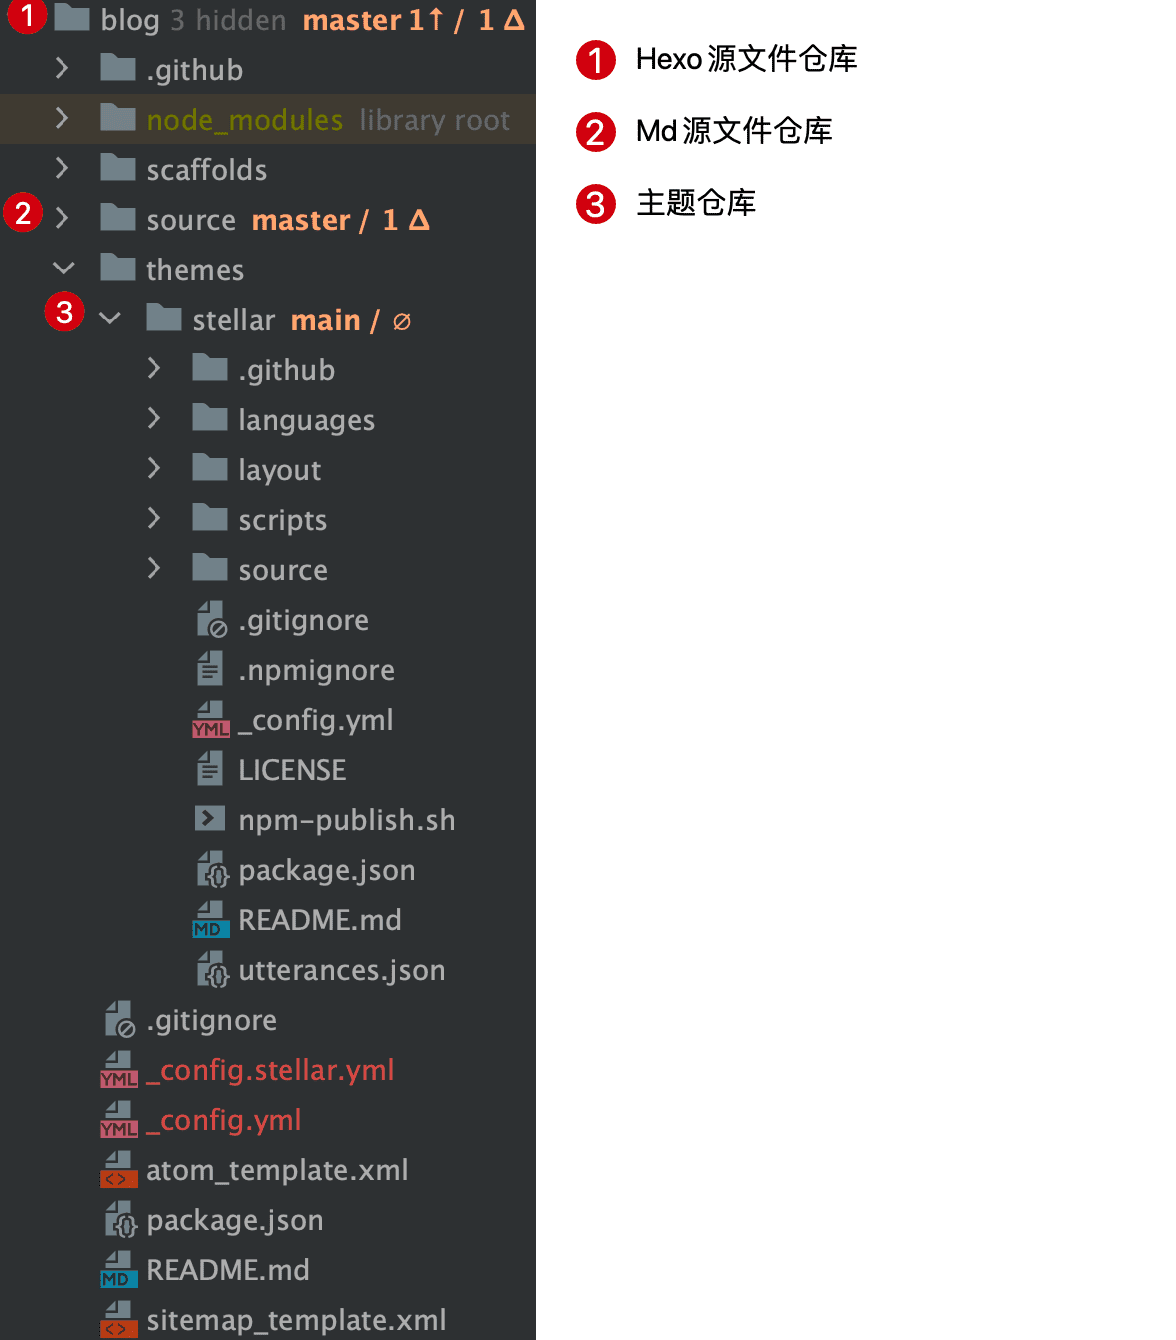
在Idea中的文件管理:
这样做的好处是,markdown源文件存以及一些不宜公开的配置信息放在私有仓库,不会被直接公开,fork一个主题仓库,在二次开发的同时, 也能获得官方的最新特性。当然,图床也用单独的一个仓库保存。
在后续折腾完主题,配合GitHub Action,本地只需要检出markdown仓库,编写&提交即可。
发布到Vercel 为什么选择Vercel CloudFlare 加速 Github Page 国内延迟和速度不是最优的,碰巧 Vercel 也能加速 Github Pages。而且CloudFlare需要更改域名的DNS服务商,强迫症接受不了(嗯, 也没仔细去研究过这个 )。
相比于 Netlify,Vercel CDN 分布广、免费功能较为齐全(Vercel 免费用户提供每个月 100GB 的流量,跟 Github Pages 是一样的)、在中国大陆访问站点在台湾速度快以及有命令行程序 CLI 等,但缺点也有许多:不能像 Netlify 那样插入代码等。
使用Vercel加速GitHub page 准备
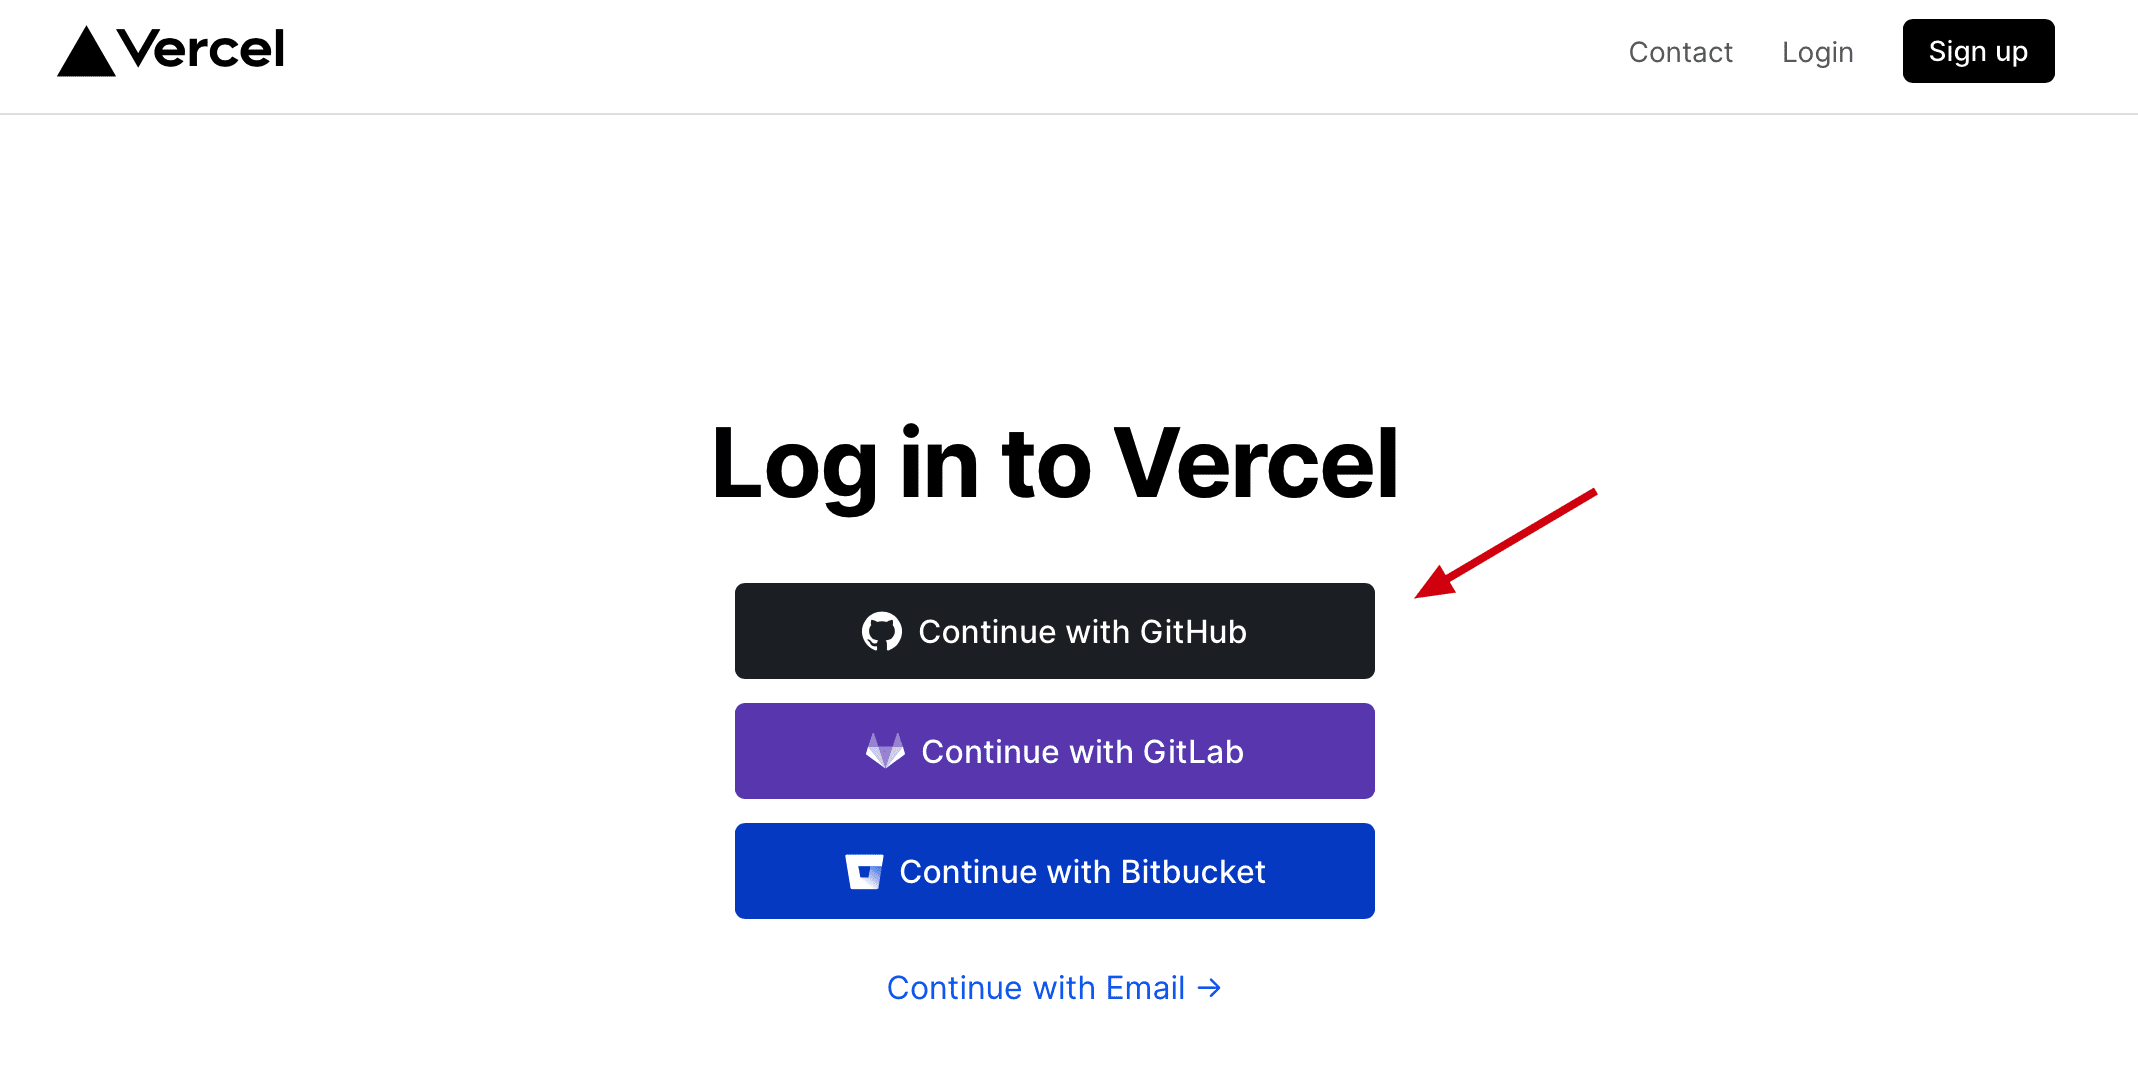
注册一个Vercel账号 这里我直接使用GitHub登录,选择需要授权的仓库,登录后如果需要提供邮箱之类的,最好提供gmail邮箱吧(网上的帖子都这么说)。
将Hexo生成文件Push到一个GitHub仓库 准备好一个仓库专门用来保存静态文件,执行Hexo三连击hexo clean && hexo g && hexo d,将hexo生成的静态站点文件推送到这个仓库。
为什么不直接用github pages对应的分支呢?
一开始也是这样直接使用gh-pages分支,但vercel好像不管每个分支上有新的提交都会重新执行部署(没有深入研究),迫于强迫症直接使用一个单独的仓库。
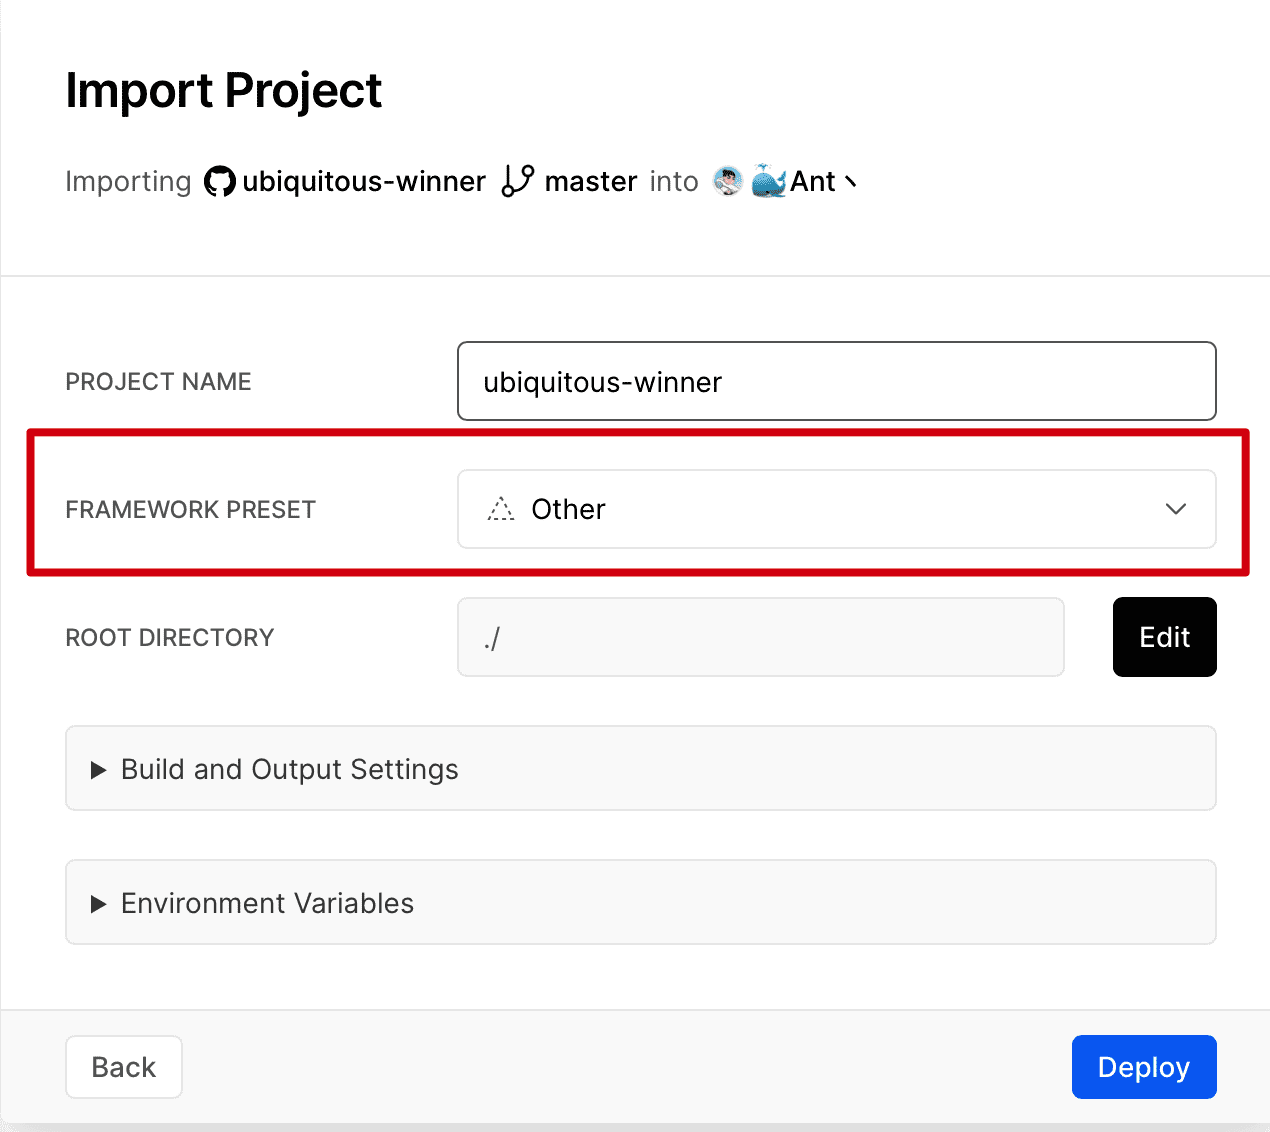
在Vercel导入静态网站仓库
具体操作不在赘述,网上教程一大堆 。
有点不一样的是,由于我这里使用了多个仓库保存源文件,在选择模板的时候选Other。
这样做就能直接将Hexo生成的静态网站直接部署,而不用执行Hexo的相关脚本。
完事之后不出意外就能直接通过类似xxxx.vercel.app的地址访问到网站。
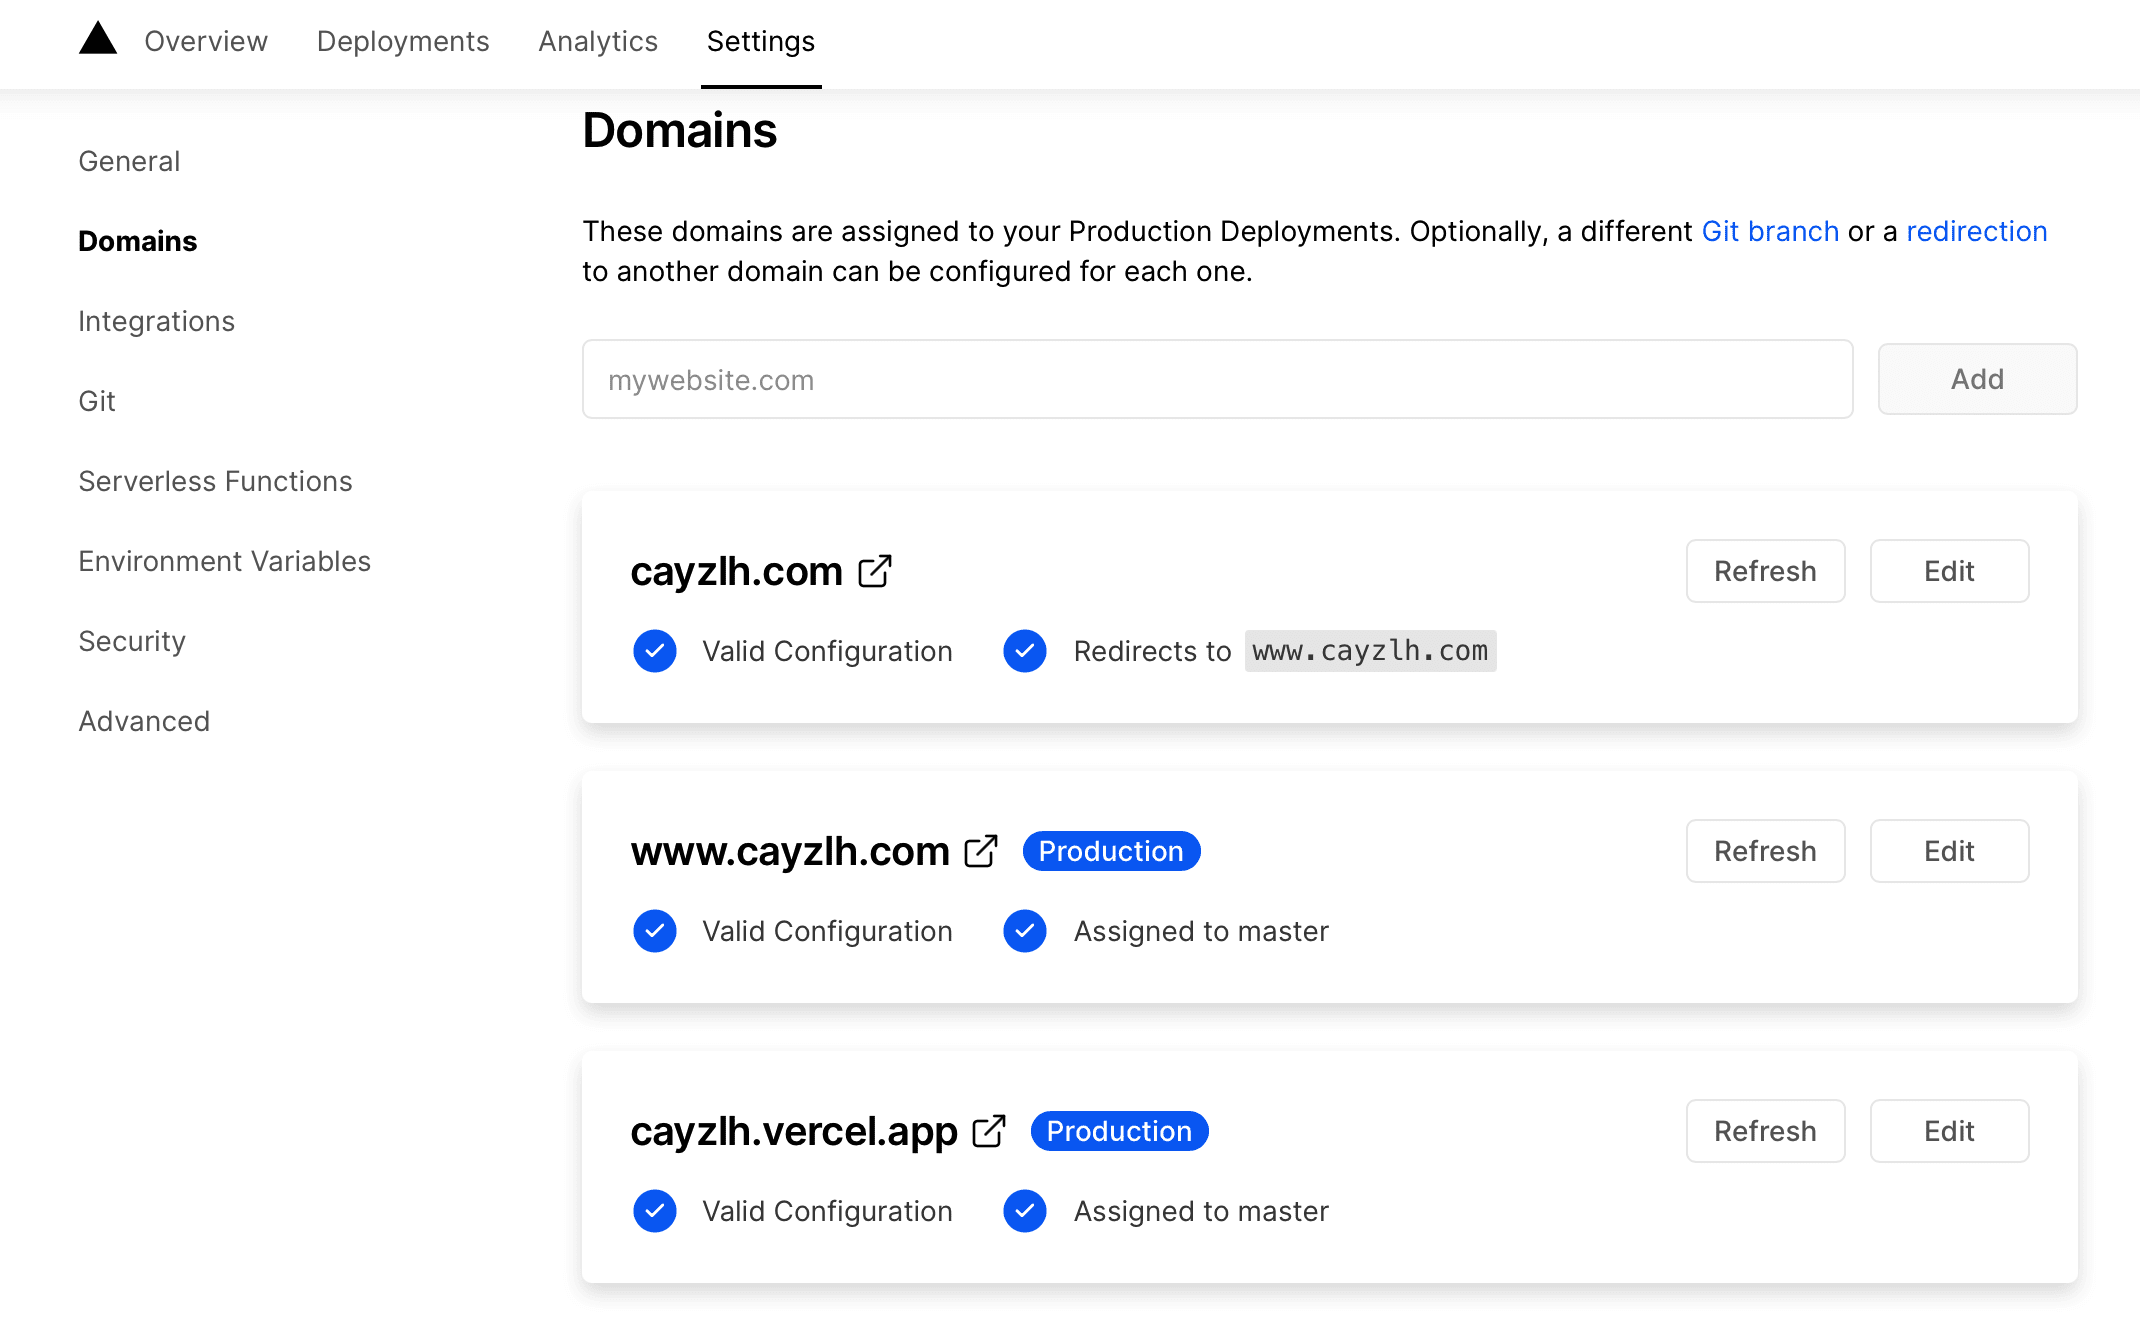
自定义域名
在Project Settings中设置自定义域名:
按照Vercel网站上的提示在域名解析添加相关解析记录,Vercel还会自动生成免费SSL证书。
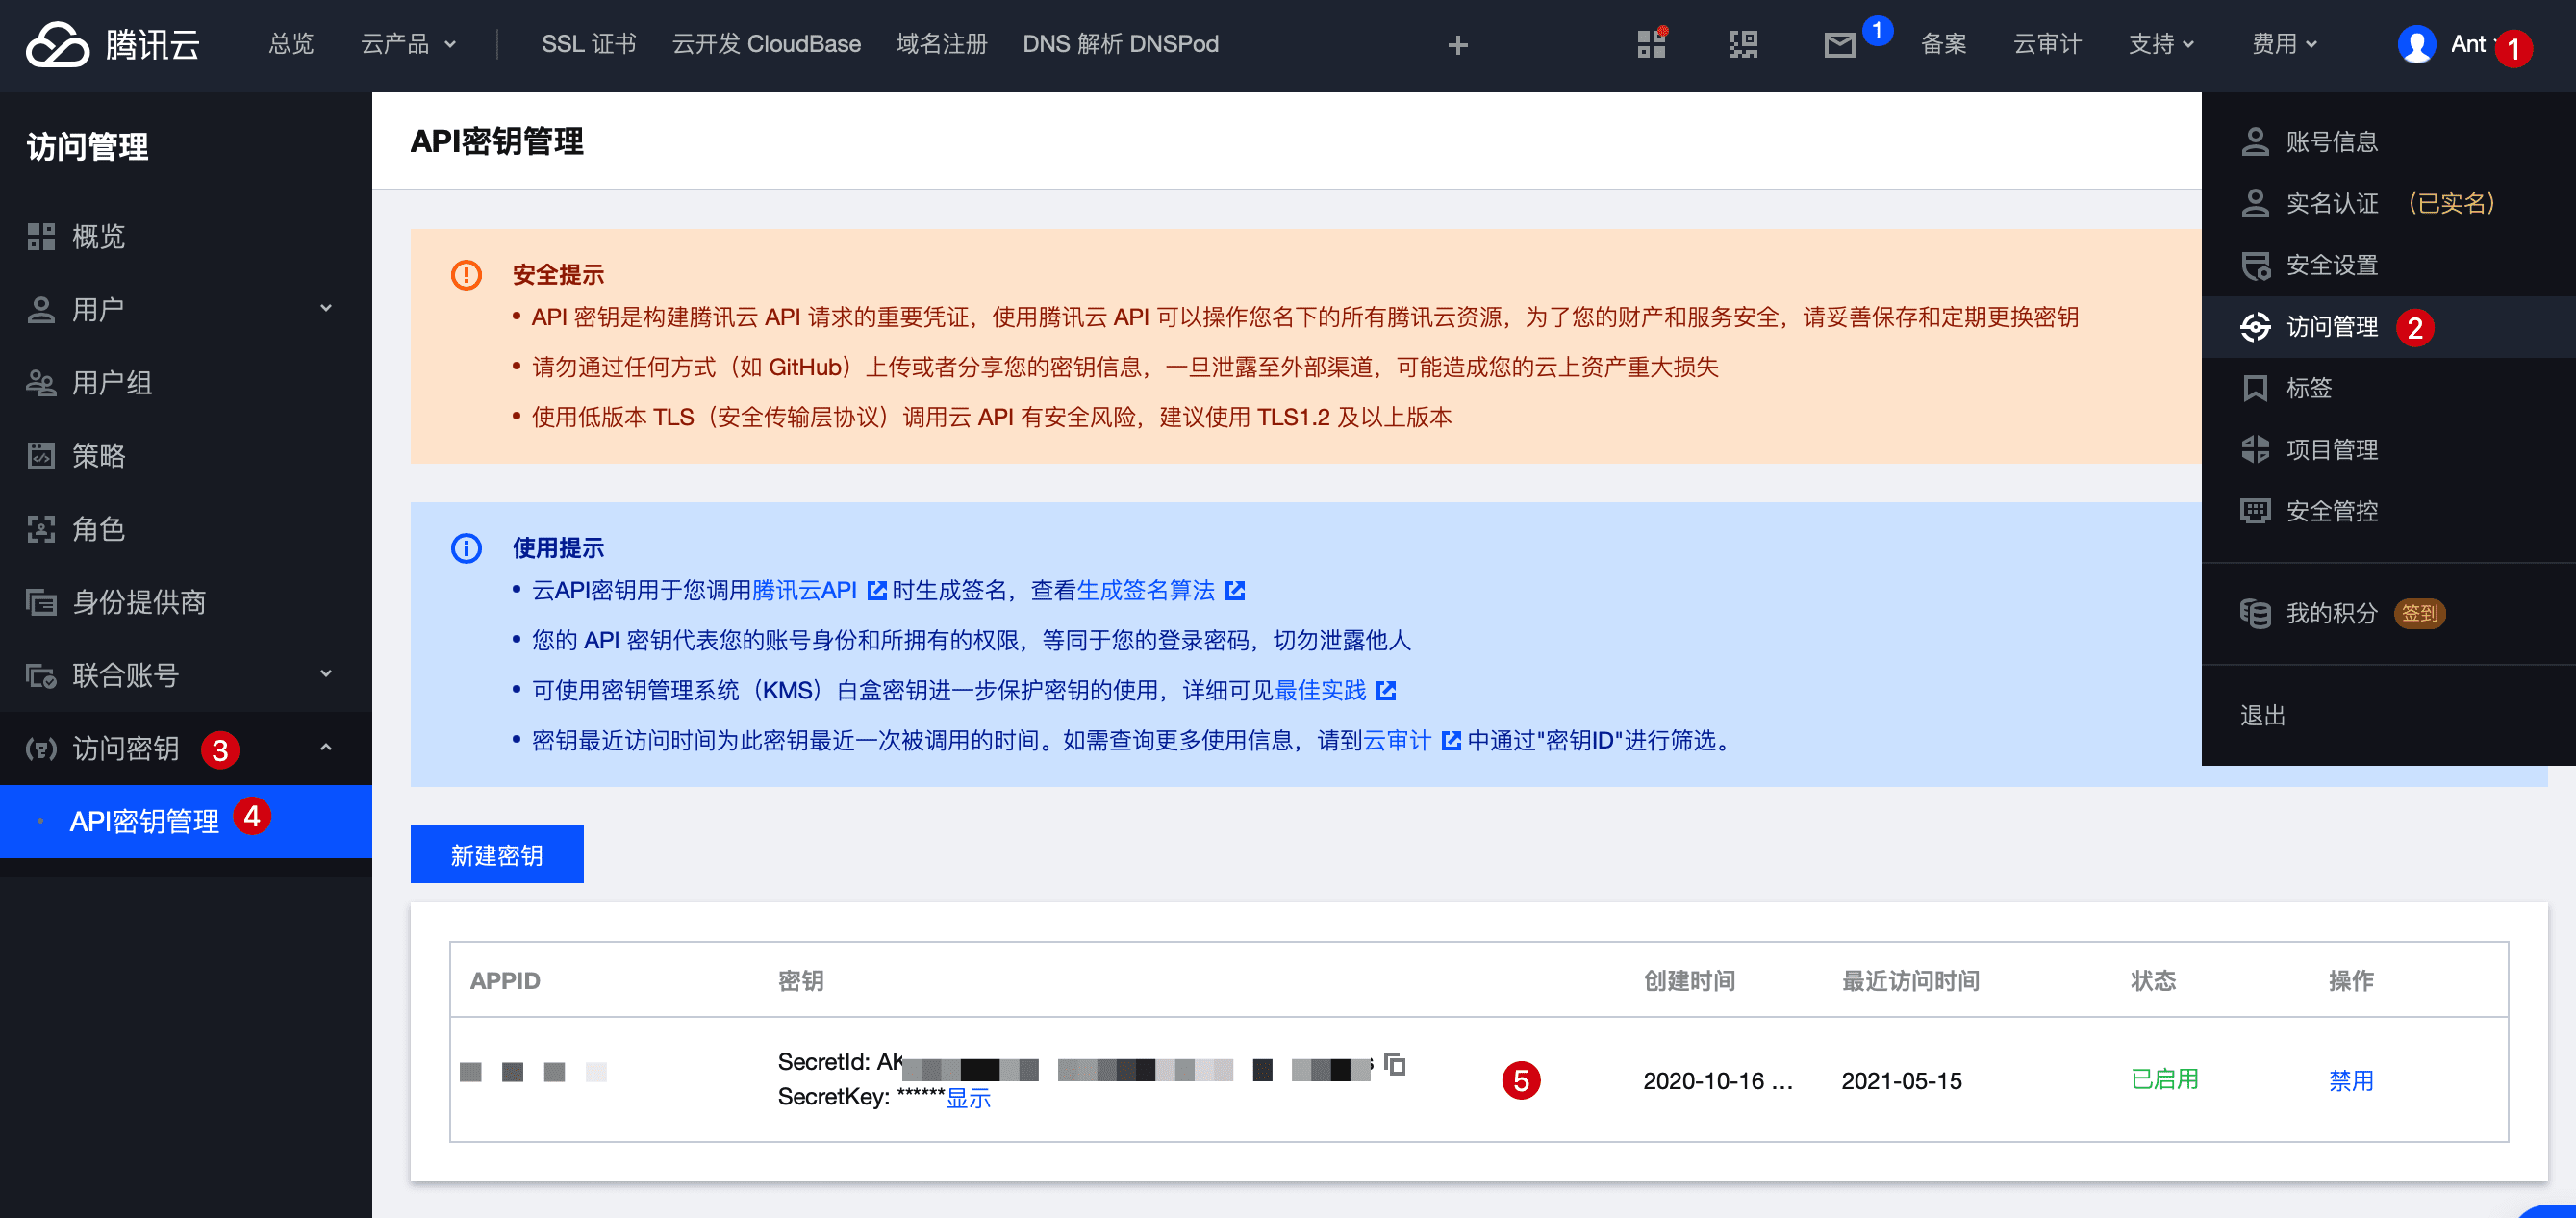
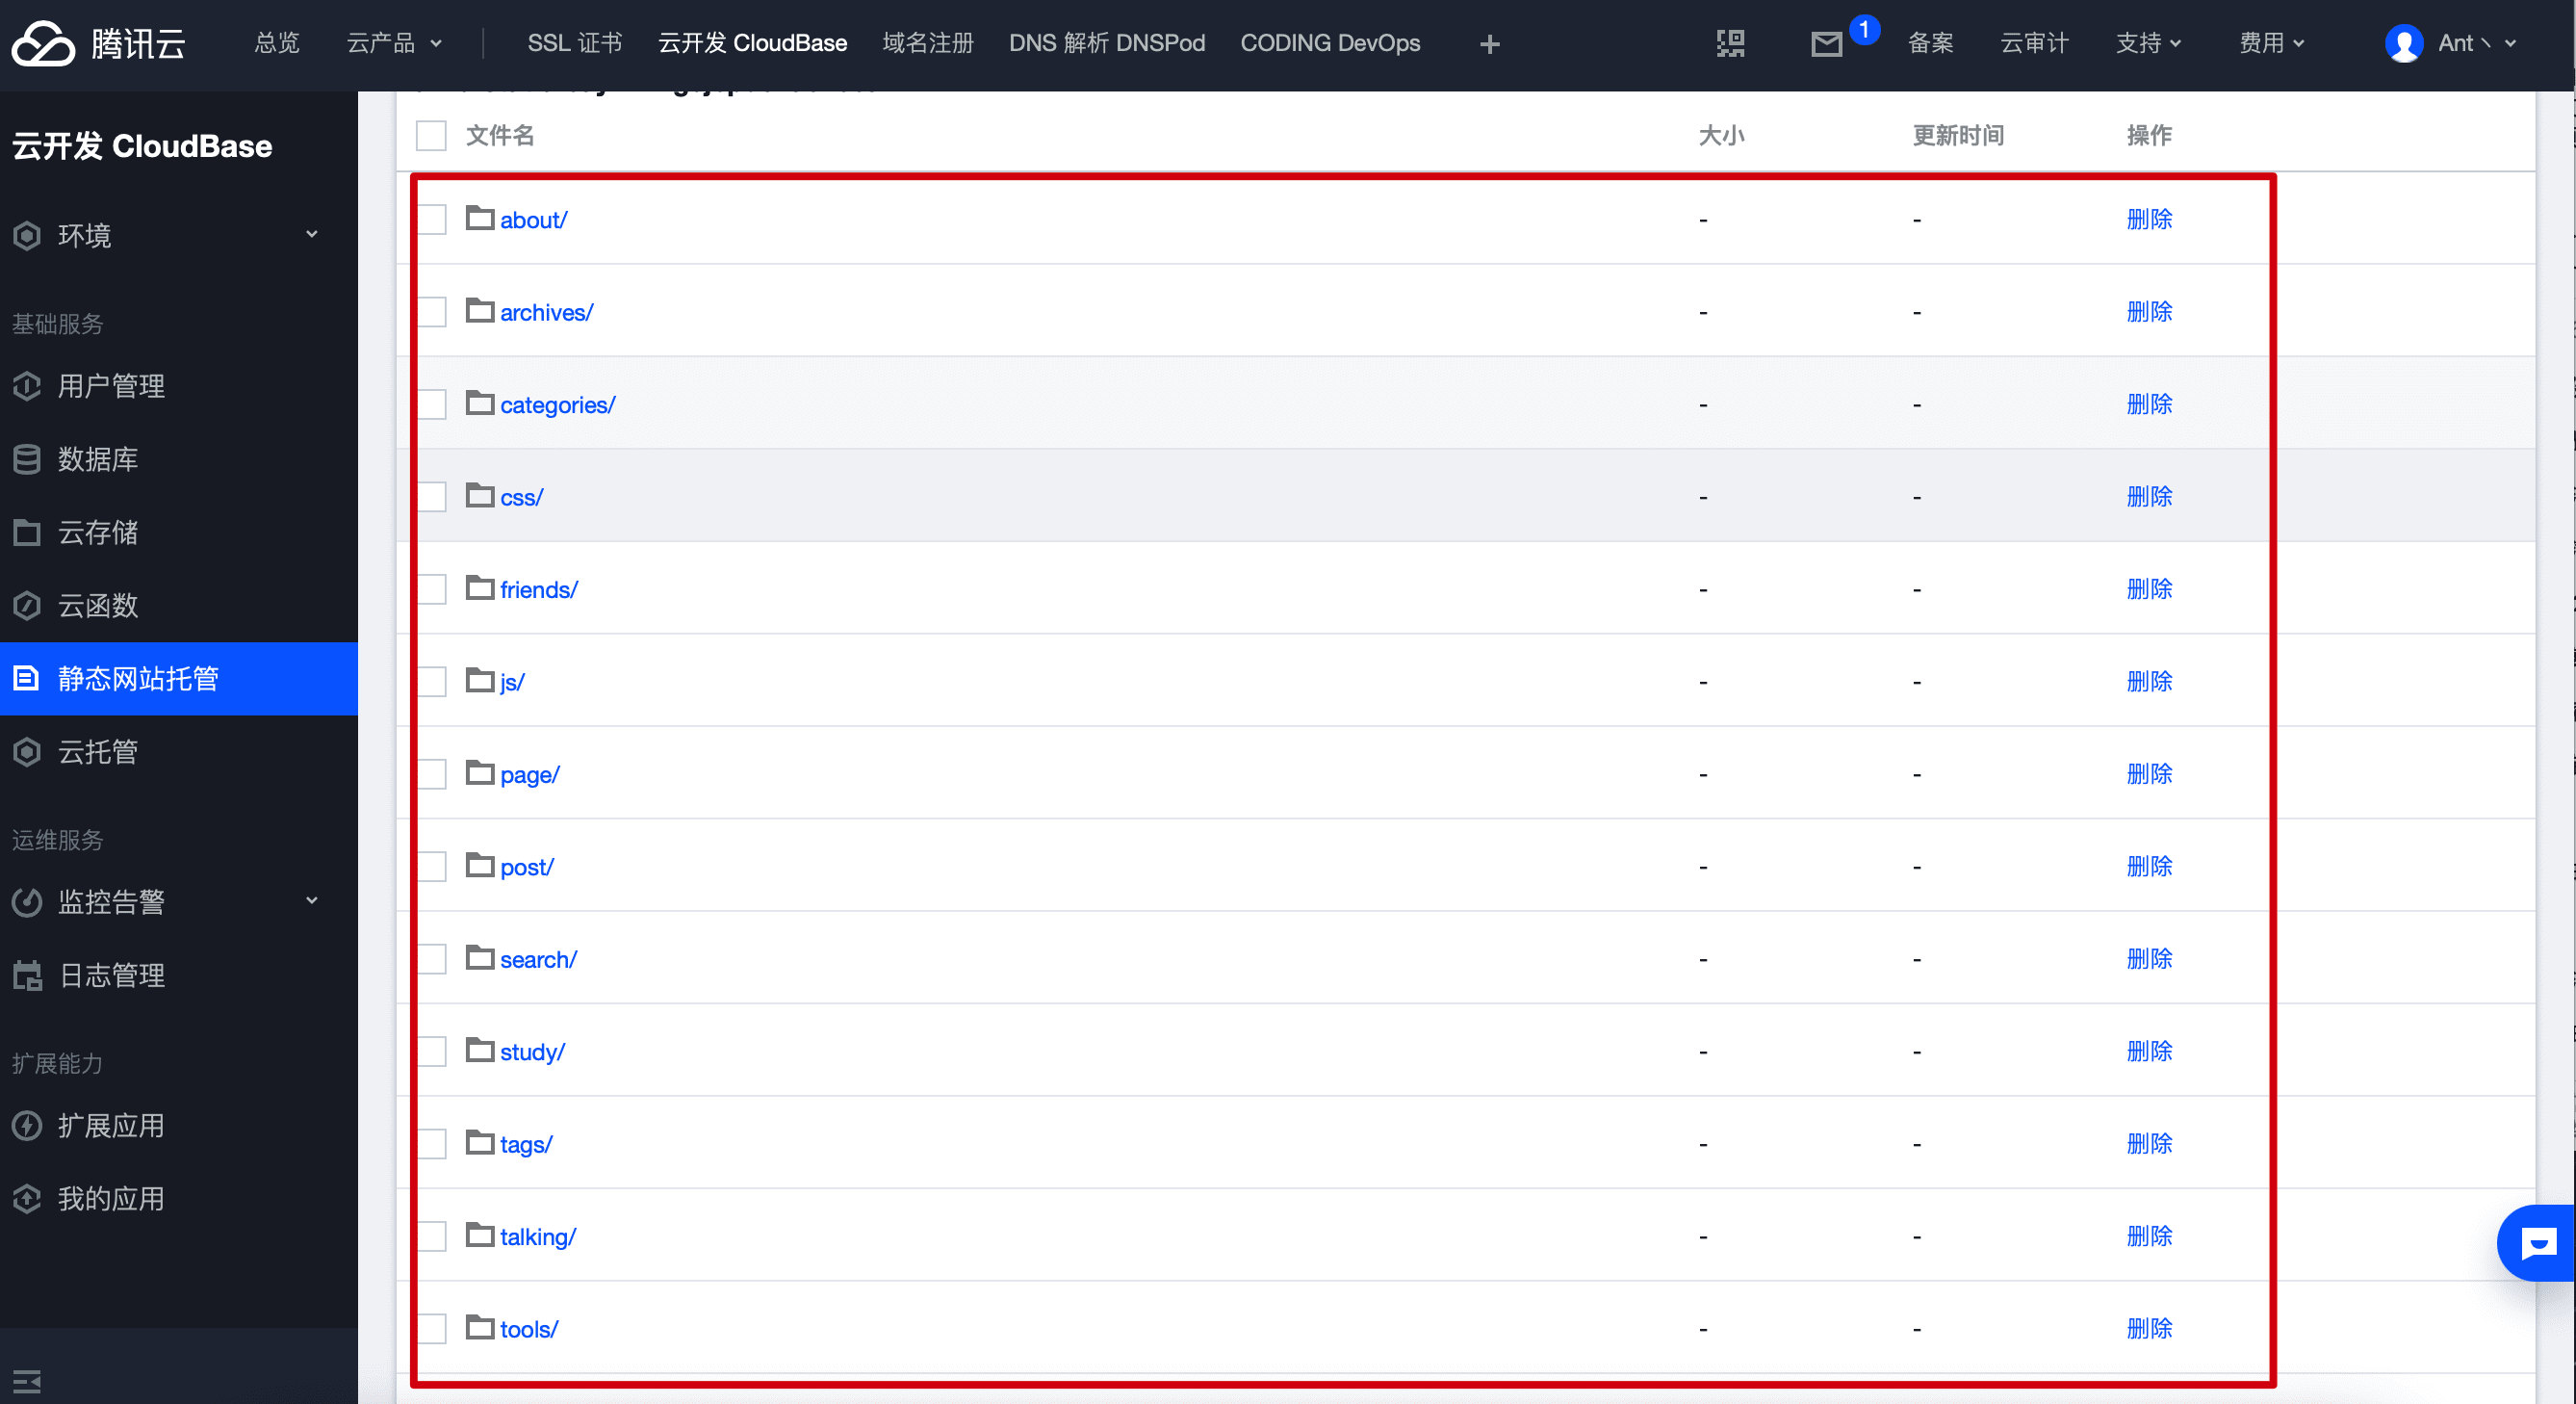
发布到云开发静态网站托管 通过云开发提供的CLI工具,可以从命令行直接将生成静态网站文件推送至静态网站托管。
首选需要获取API密钥
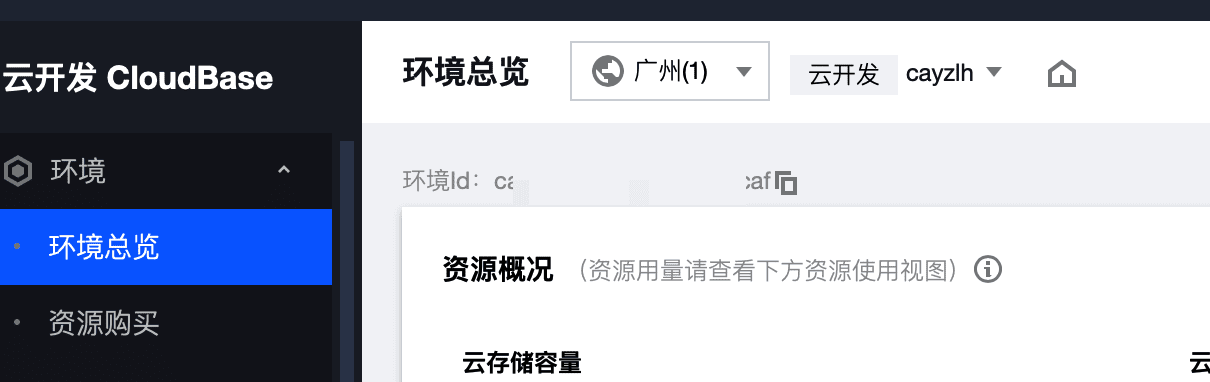
获取云开发环境ID
推送至静态网站托管
将Hexo三连击变成四连击
修改package.json文件,在scripts处添加:
"scripts" : { "build" : "hexo generate" , "clean" : "hexo clean" , "deploy" : "hexo deploy" , "server" : "hexo server" , "push" : "tcb hosting deploy ./public -r gz -e YourDevID" }
这样,Hexo三连部署就可以变成四连部署:
hexo clean && hexo g && hexo d && npm run push
完事之后会将生成的public文件推送到github仓库和静态网站托管中。
静态网站托管自定义域名
在基础配置里面配置自定义域名,国内托管,前提是域名要备案,云开发支持域名备案服务 。
在这个页面还能配置其他内容比如节点缓存配置、浏览器缓存配置、访问配置(防盗链配置、IP黑白名单配置、IP访问限频配置)。
文档参考 :
GitHub Actions 关于GitHub Actions GitHub Actions 是 GitHub 的持续集成服务 ,于2018年10月推出 。
这些天,我一直在试用,觉得它非常强大,有创意,比 Travis CI 玩法更多。
持续集成由很多操作组成,比如抓取代码、运行测试、登录远程服务器,发布到第三方服务等等。GitHub 把这些操作就称为 actions。
很多操作在不同项目里面是类似的,完全可以共享。GitHub 注意到了这一点,想出了一个很妙的点子,允许开发者把每个操作写成独立的脚本文件,存放到代码仓库,使得其他开发者可以引用。
如果你需要某个 action,不必自己写复杂的脚本,直接引用他人写好的 action 即可,整个持续集成过程,就变成了一个 actions 的组合。这就是 GitHub Actions 最特别的地方。
对于以上两种部署方案,都需要手动执行Hexo三连和云开发CLI命令,也需要在本地安装nodejs环境以及云开发tcb客户端,写完文章后发布起来比较麻烦。
GitHub Actions很好的解决了这个问题,下面记录下本站的GitHub Actions是怎么配置的。
如何使用GitHub Actions部署hexo博客,网上有一大堆的教程 ,这里主要记录一下多个文件夹分离的GitHub仓库管理 的场景下如何配置GitHub Actions。
目前有三个仓库管理我的站点:
blog-private : 私有仓库,用来保存markdown源文件、配置文件等blog-framework : 共有仓库,用来保存hexo init生成的文件hexo-theme-stellar : 主题文件,fork自原主题仓库
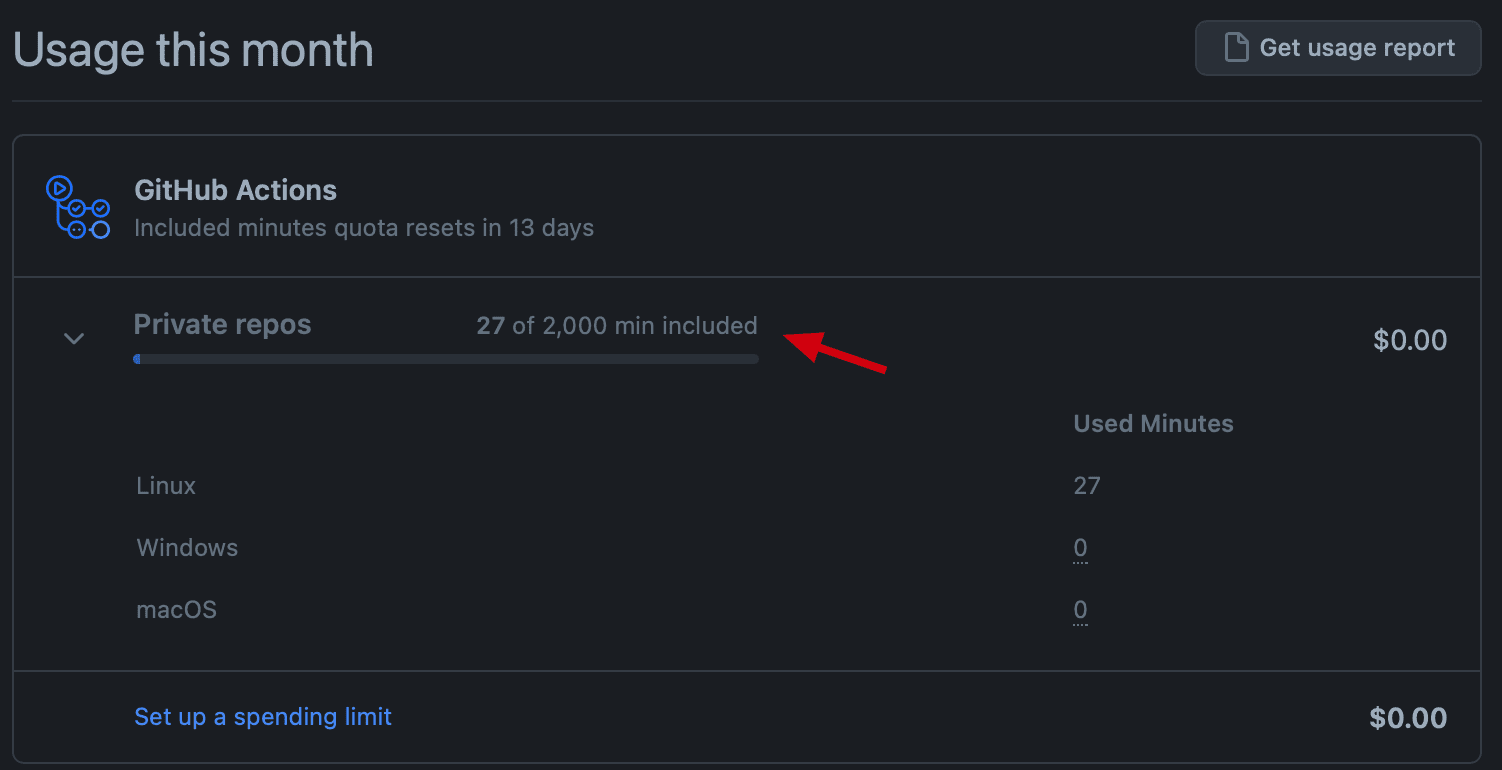
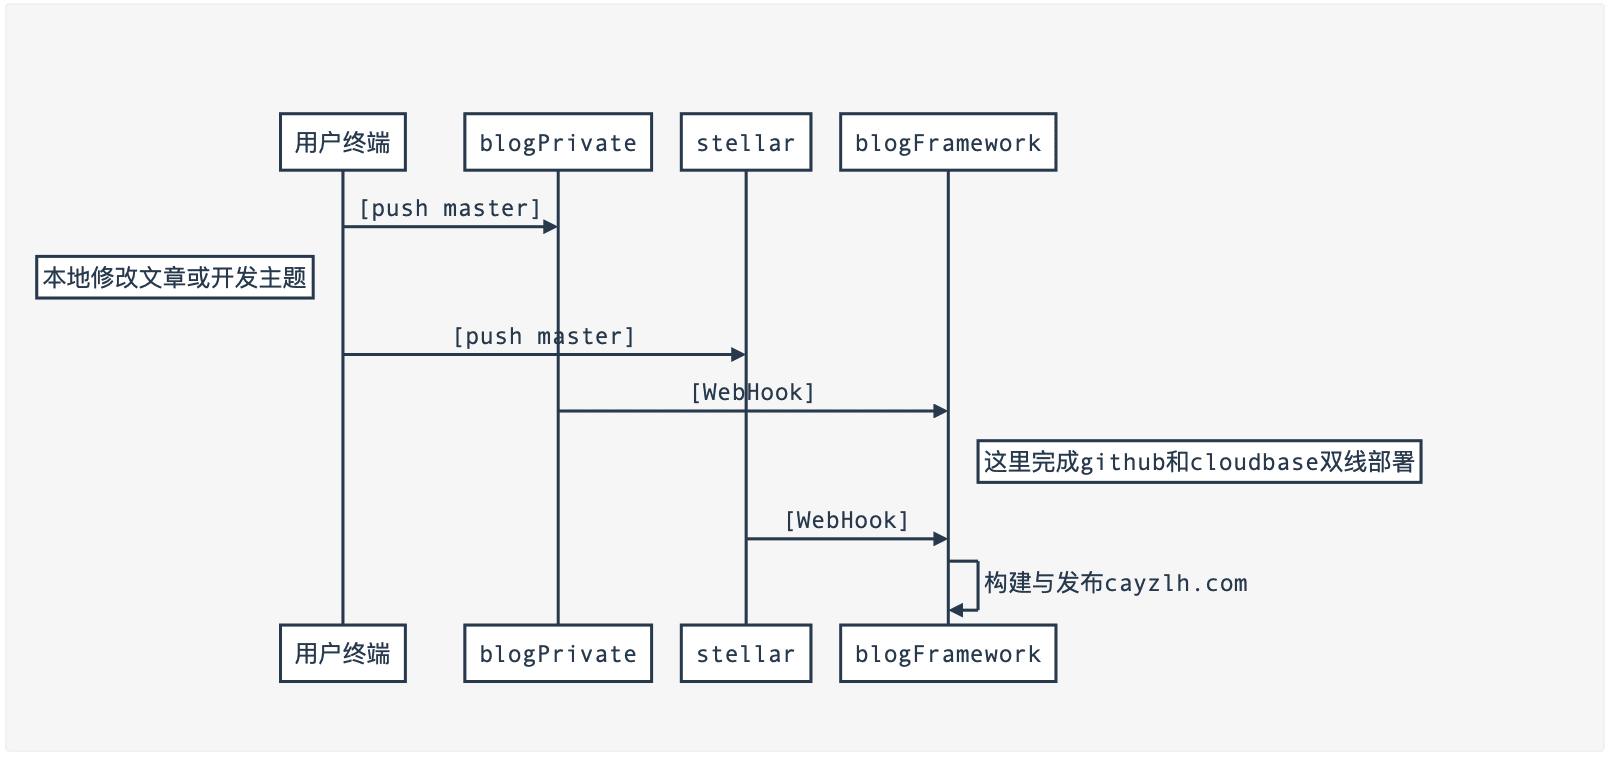
如何发布 由于GitHub对白嫖用户的私有仓库使用GitHub Actions每个月有时间限制。所以总体思路是当blog-private 和hexo-theme-stellar 这两个仓库接收到push的时候,通过Webhook通知blog-framework 仓库来执行Hexo构建与部署。
(私有仓库每月2000分钟GitHub actions使用时长)
流程示意图:
workflows 记录下具体的workflows配置内容。
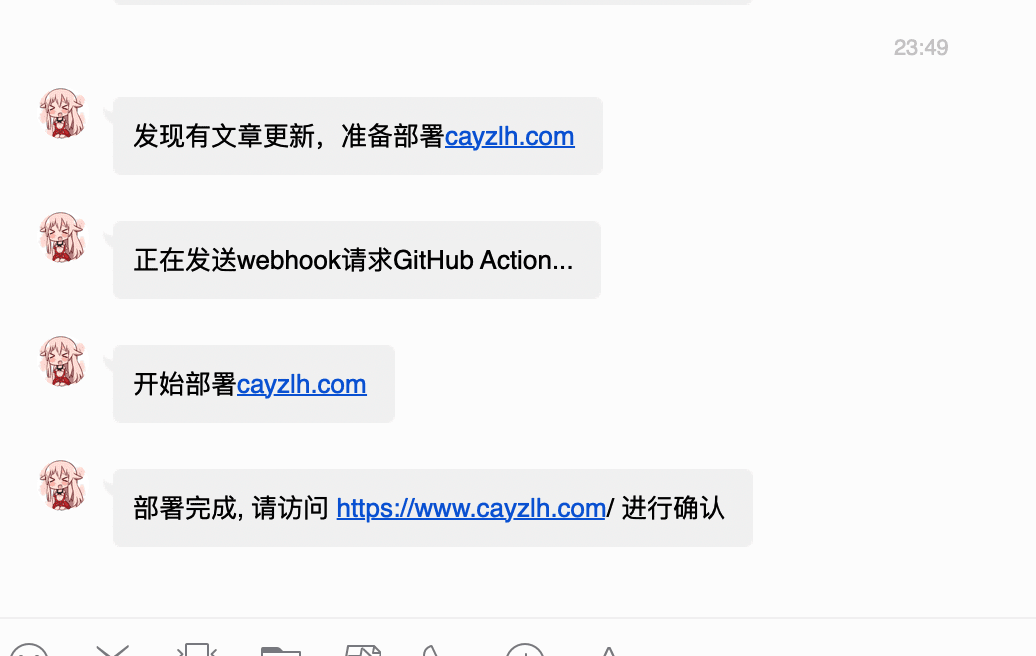
点击查看blog-private的GitHub Actions配置 .github/workflows/deploy.yml name: cayzlh.com on: push: branches: - master jobs: build: name: Deploy cayzlh.com. runs-on: ubuntu-latest strategy: matrix: os: [ubuntu-latest ] node_version: [13. x ] steps: - name: start post notification. run: | curl https://qmsg.zendee.cn/send/${{secrets.QMSG_KEY}} -X POST -d 'msg=发现有文章更新,准备部署cayzlh.com ' - name: request github action api. run: | curl -X POST https://api.github.com/repos/cayzlh/blog-framework/dispatches \ -H "Accept: application/vnd.github.everest-preview+json" \ -H "Authorization: token ${{secrets.ACTIONS_TRIGGER_TOKEN}}" \ --data '{"event_type": "Hexo"}' - name: end post notification. run: | curl https://qmsg.zendee.cn/send/${{secrets.QMSG_KEY}} -X POST -d 'msg=正在发送webhook请求GitHub Action... '
其中重点内容就是通过curl发送一个请求,去通知blogFramework仓库:
url -X POST https://api.github.com/repos/cayzlh/blog-framework/dispatches \ -H "Accept: application/vnd.github.everest-preview+json" \ -H "Authorization: token ${{secrets.ACTIONS_TRIGGER_TOKEN} }" \ --data '{"event_type": "Hexo"}'
点击查看hexo-theme-stellar的GitHub Actions配置 内容与上面的类似,差别在于QMSG通知的内容不一样。
.github/workflows/deploy.yml name: cayzlh.com on: push: branches: - main jobs: build: name: Deploy cayzlh.com. runs-on: ubuntu-latest strategy: matrix: os: [ubuntu-latest ] node_version: [13. x ] steps: - name: start post notification. run: | curl https://qmsg.zendee.cn/send/${{secrets.QMSG_KEY}} -X POST -d 'msg=发现主题有更新更新,准备部署cayzlh.com ' - name: request github action api. run: | curl -X POST https://api.github.com/repos/cayzlh/blog-framework/dispatches \ -H "Accept: application/vnd.github.everest-preview+json" \ -H "Authorization: token ${{secrets.ACTIONS_TRIGGER_TOKEN}}" \ --data '{"event_type": "Hexo"}' - name: end post notification. run: | curl https://qmsg.zendee.cn/send/${{secrets.QMSG_KEY}} -X POST -d 'msg=正在发送webhook请求GitHub Action... '
点击查看blog-framework的GitHub Actions配置 这个仓库的workflows配置承担着构建的全过程,内容如下:
.github/workflows/deploy.yml name: cayzlh.com on: push: branches: - master repository_dispatch: types: Hexo jobs: build: name: Deploy cayzlh.com runs-on: ubuntu-latest strategy: matrix: os: [ubuntu-latest ] node_version: [13. x ] steps: - name: start notification run: | curl https://qmsg.zendee.cn/send/${{secrets.QMSG_KEY}} -X POST -d 'msg=开始部署cayzlh.com ' - name: Checkout self uses: actions/checkout@v2 - name: Use Node.js ${{ matrix.node_version }} uses: actions/setup-node@v1 with: node-version: ${{ matrix.node_version }} - name: Configuration environment env: HEXO_DEPLOY_PRI: ${{secrets.HEXO_DEPLOY_PRI}} GIT_USER: 'GitHub Action CI' GIT_EMAIL: 'ant.chenanyu@gmail.com' run: | sudo timedatectl set-timezone "Asia/Shanghai" mkdir -p ~/.ssh/ echo "$HEXO_DEPLOY_PRI" > ~/.ssh/id_rsa chmod 600 ~/.ssh/id_rsa ssh-keyscan github.com >> ~/.ssh/known_hosts git config --global user.name "$GIT_USER" git config --global user.email "$GIT_EMAIL" - name: Checkout source run: | rm -rf source git clone git@github.com:cayzlh/blog-private.git source rm -rf ./source/.git rm -rf ./source/.github rm -rf ./_config.yml mv ./source/_config.stellar.yml ./ mv ./source/_config.site.yml ./_config.yml - name: Checkout theme run: | git clone git@github.com:cayzlh/hexo-theme-stellar.git themes/stellar rm -rf ./themes/stellar/_config.yml - name: Cache Node Dependencies id: cache uses: actions/cache@v1 with: path: node_modules key: ${{runner.OS}}-npm-caches-${{ hashFiles('package-lock.json') }} - name: Install dependencies. run: | npm i -g @cloudbase/cli npm install hexo-cli -g npm install - name: login to cloudbase run: | tcb login --apiKeyId ${{secrets.SECRET_ID}} --apiKey ${{secrets.SECRET_KEY}} - name: Deploy Github page. run: | hexo clean hexo g hexo d - name: Deploy cloudbase. run: | tcb hosting deploy ./public -r gz -e ${{secrets.ENV_ID}} - name: notification run: | curl https://qmsg.zendee.cn/send/${{secrets.QMSG_KEY}} -X POST -d 'msg=部署完成, 请访问 https://www.cayzlh.com/ 进行确认 '
在on节点增加:
repository_dispatch:
  types: Hexo
表示该仓库允许通过webhook的方式来触发action,并且指定类型为Hexo(体现在其他两个仓库的curl请求参数里)。
阅读脚本内容,其实比较简单, 就是各种检出仓库,配置环境,执行构建脚本等:
收到webhook请求 检出自身(Checkout self) 配置环境变量 检出souce 文件夹(即:blog-private仓库) 检出主题文件夹(即:hexo-theme-stellar仓库) 通过npm安装需要的依赖(tcb、hexo依赖等) 登录CloudBase hexo 三连deploy到CloudBase静态网站托管
以上配置内容仅提供一种思路,GitHub Actions还是可以有很多玩法的。
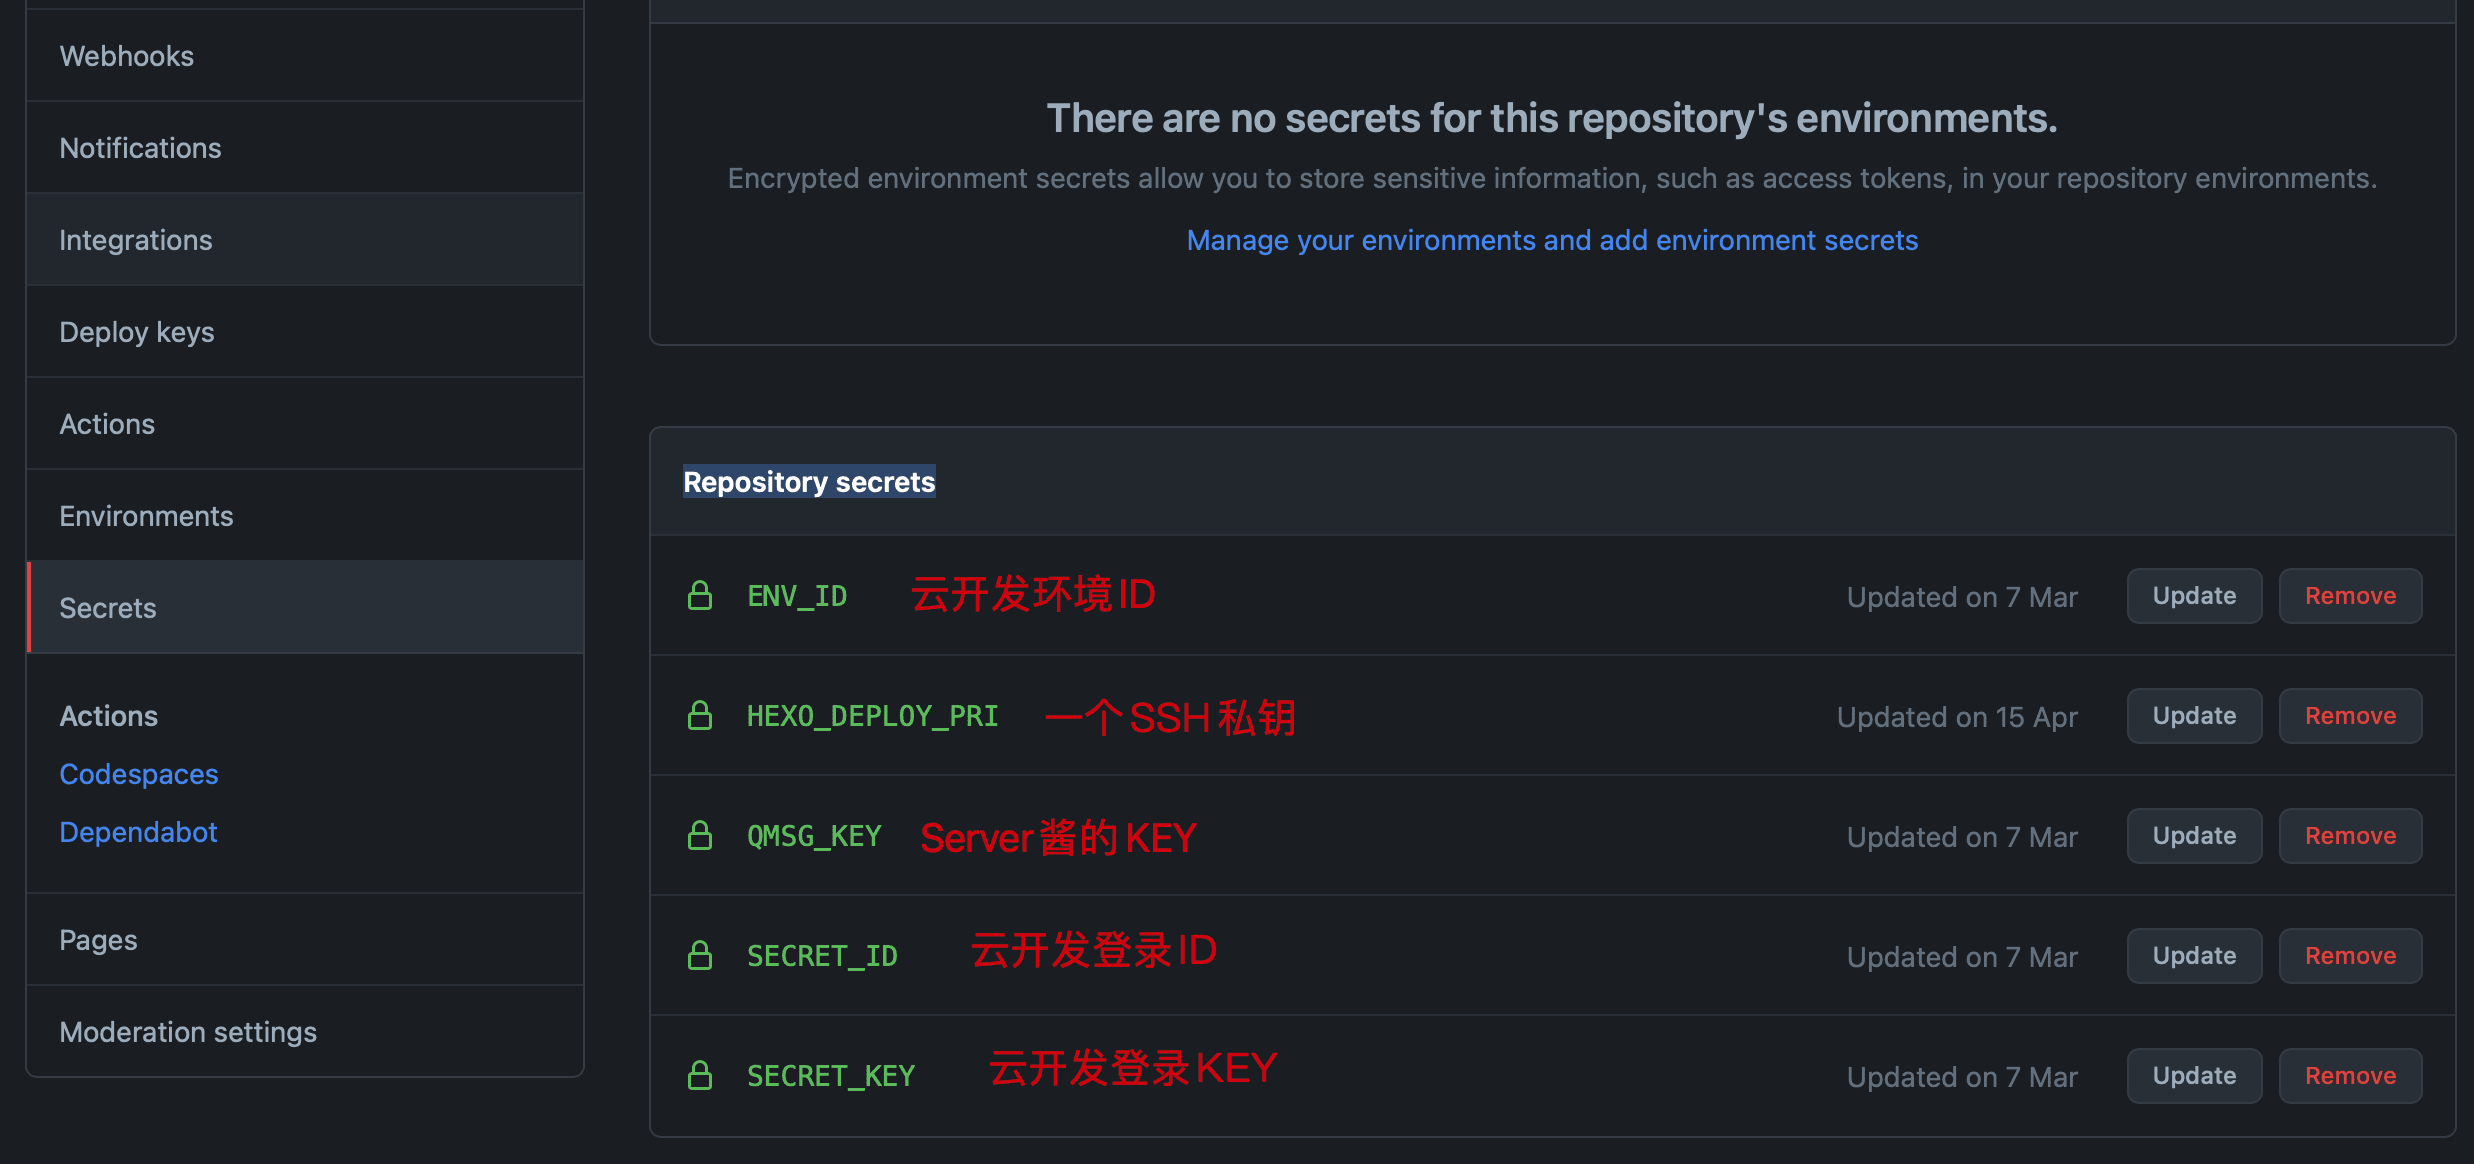
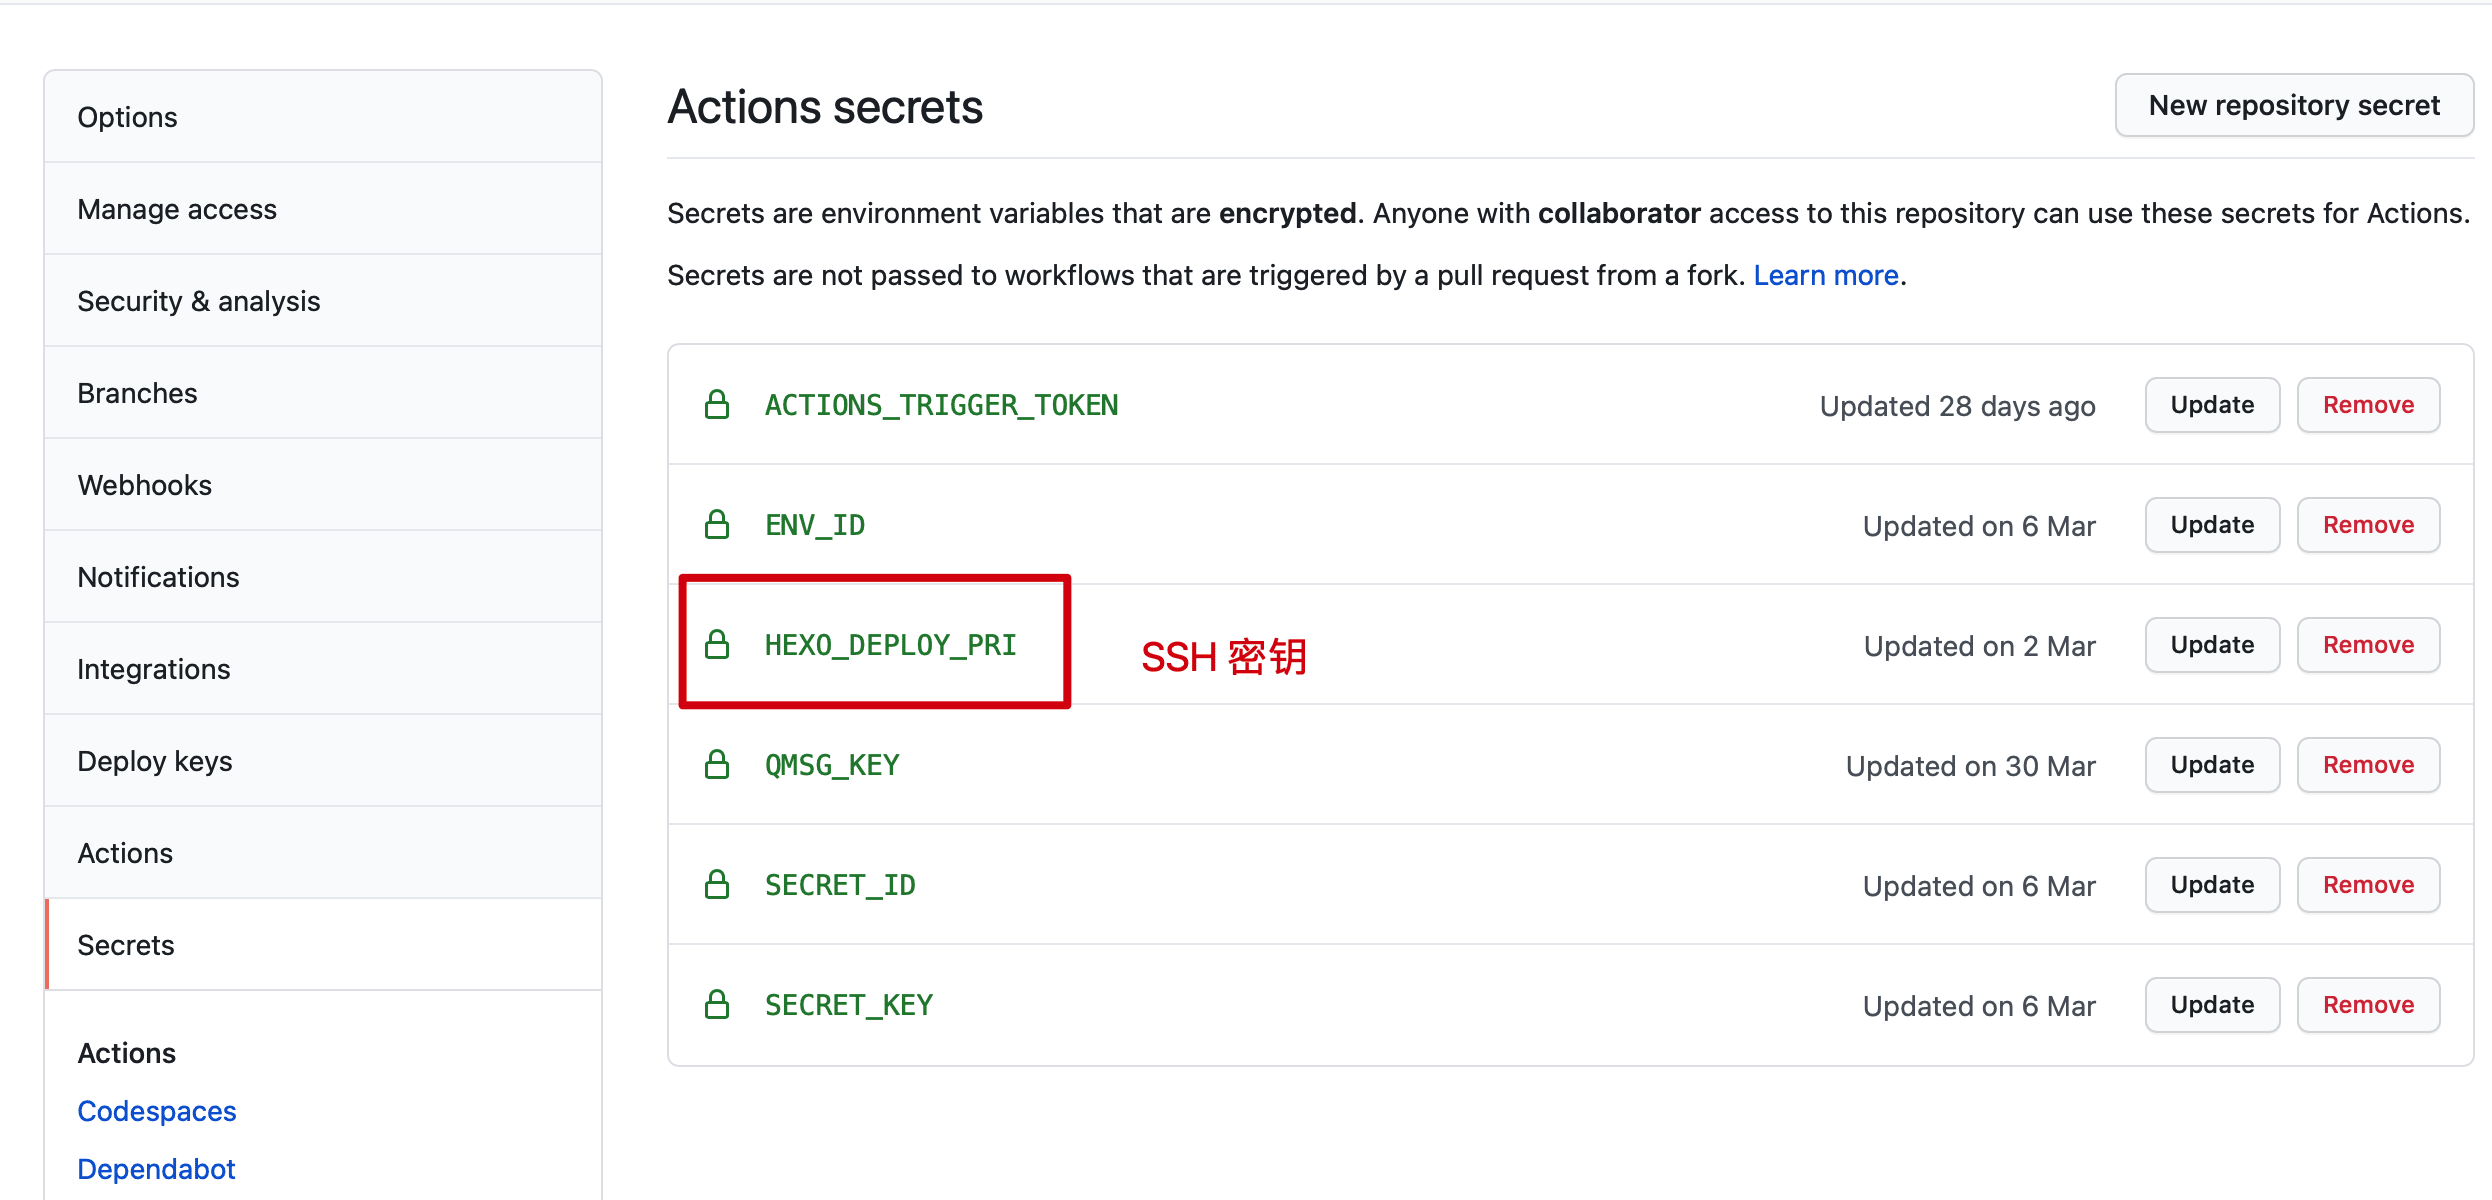
除了以上配置之外,还需要根据实际情况在仓库Settings里面配置相关的Repository secrets:
三个仓库配置下来,私有仓库只负责发送一个请求,耗时极少。耗时较长的操作都放到了可白嫖的public仓库。这样就算网站更新叫频繁,也不会使用多少GitHub actions的免费构建时间。
通知 Server酱
在action里面调api,发送QQ通知,具体体现在脚本里了。
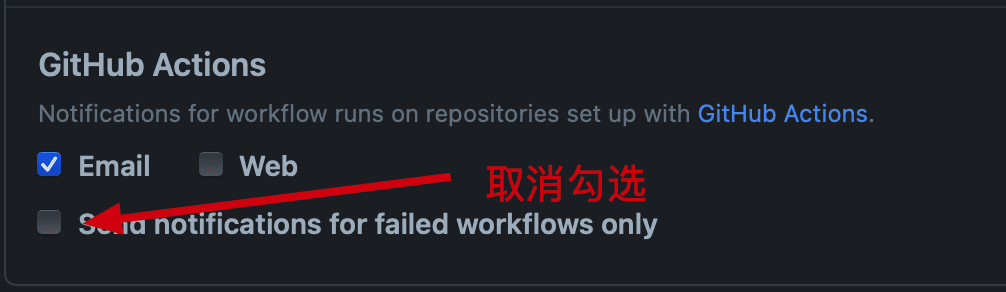
邮件通知
简单粗暴的在个人设置- Notifications里,GitHub Actions栏目里设置邮件通知,取消勾选只失败时通知:
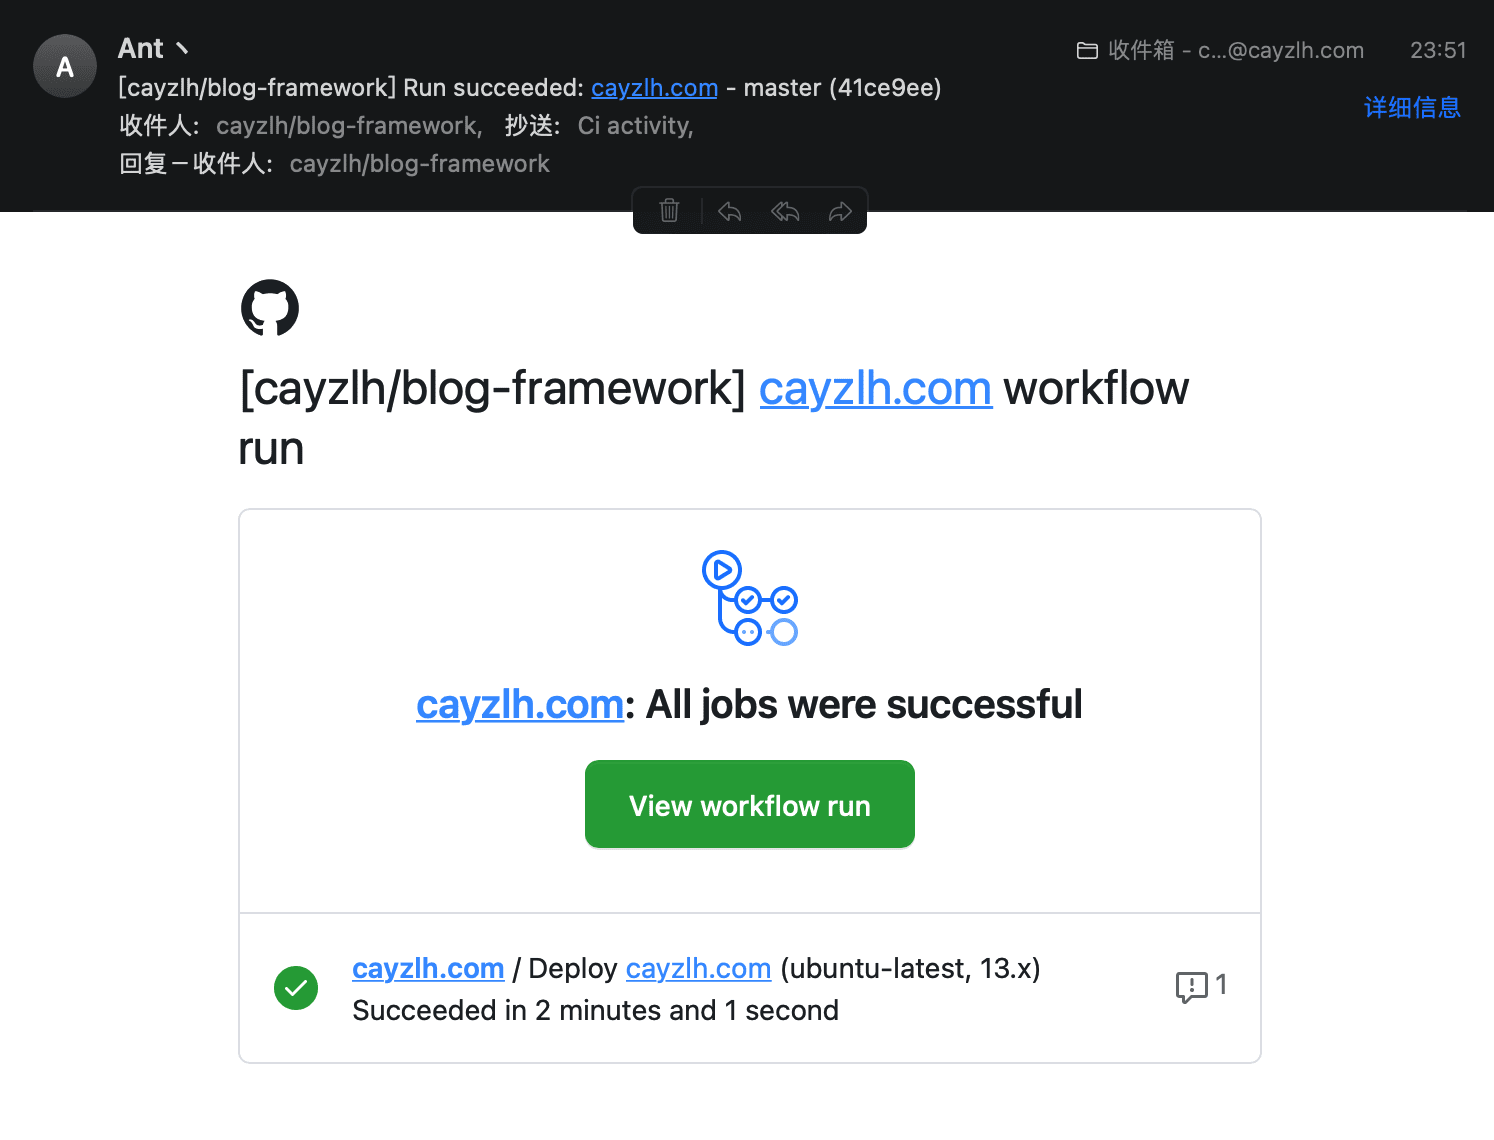
这样,在action执行成功之后就能收到邮件通知:
关于密钥 在整个workflows流程里面,检出仓库、执行hexo d 等,都需要用到ssh密钥,这里也简单记录下配置方式。
思路就是模拟在本地电脑使用ssh-key来使用GitHub的思路:
在本地生成密钥
ssh-keygen -f github-deploy-key -C "youremail@xxx.com"
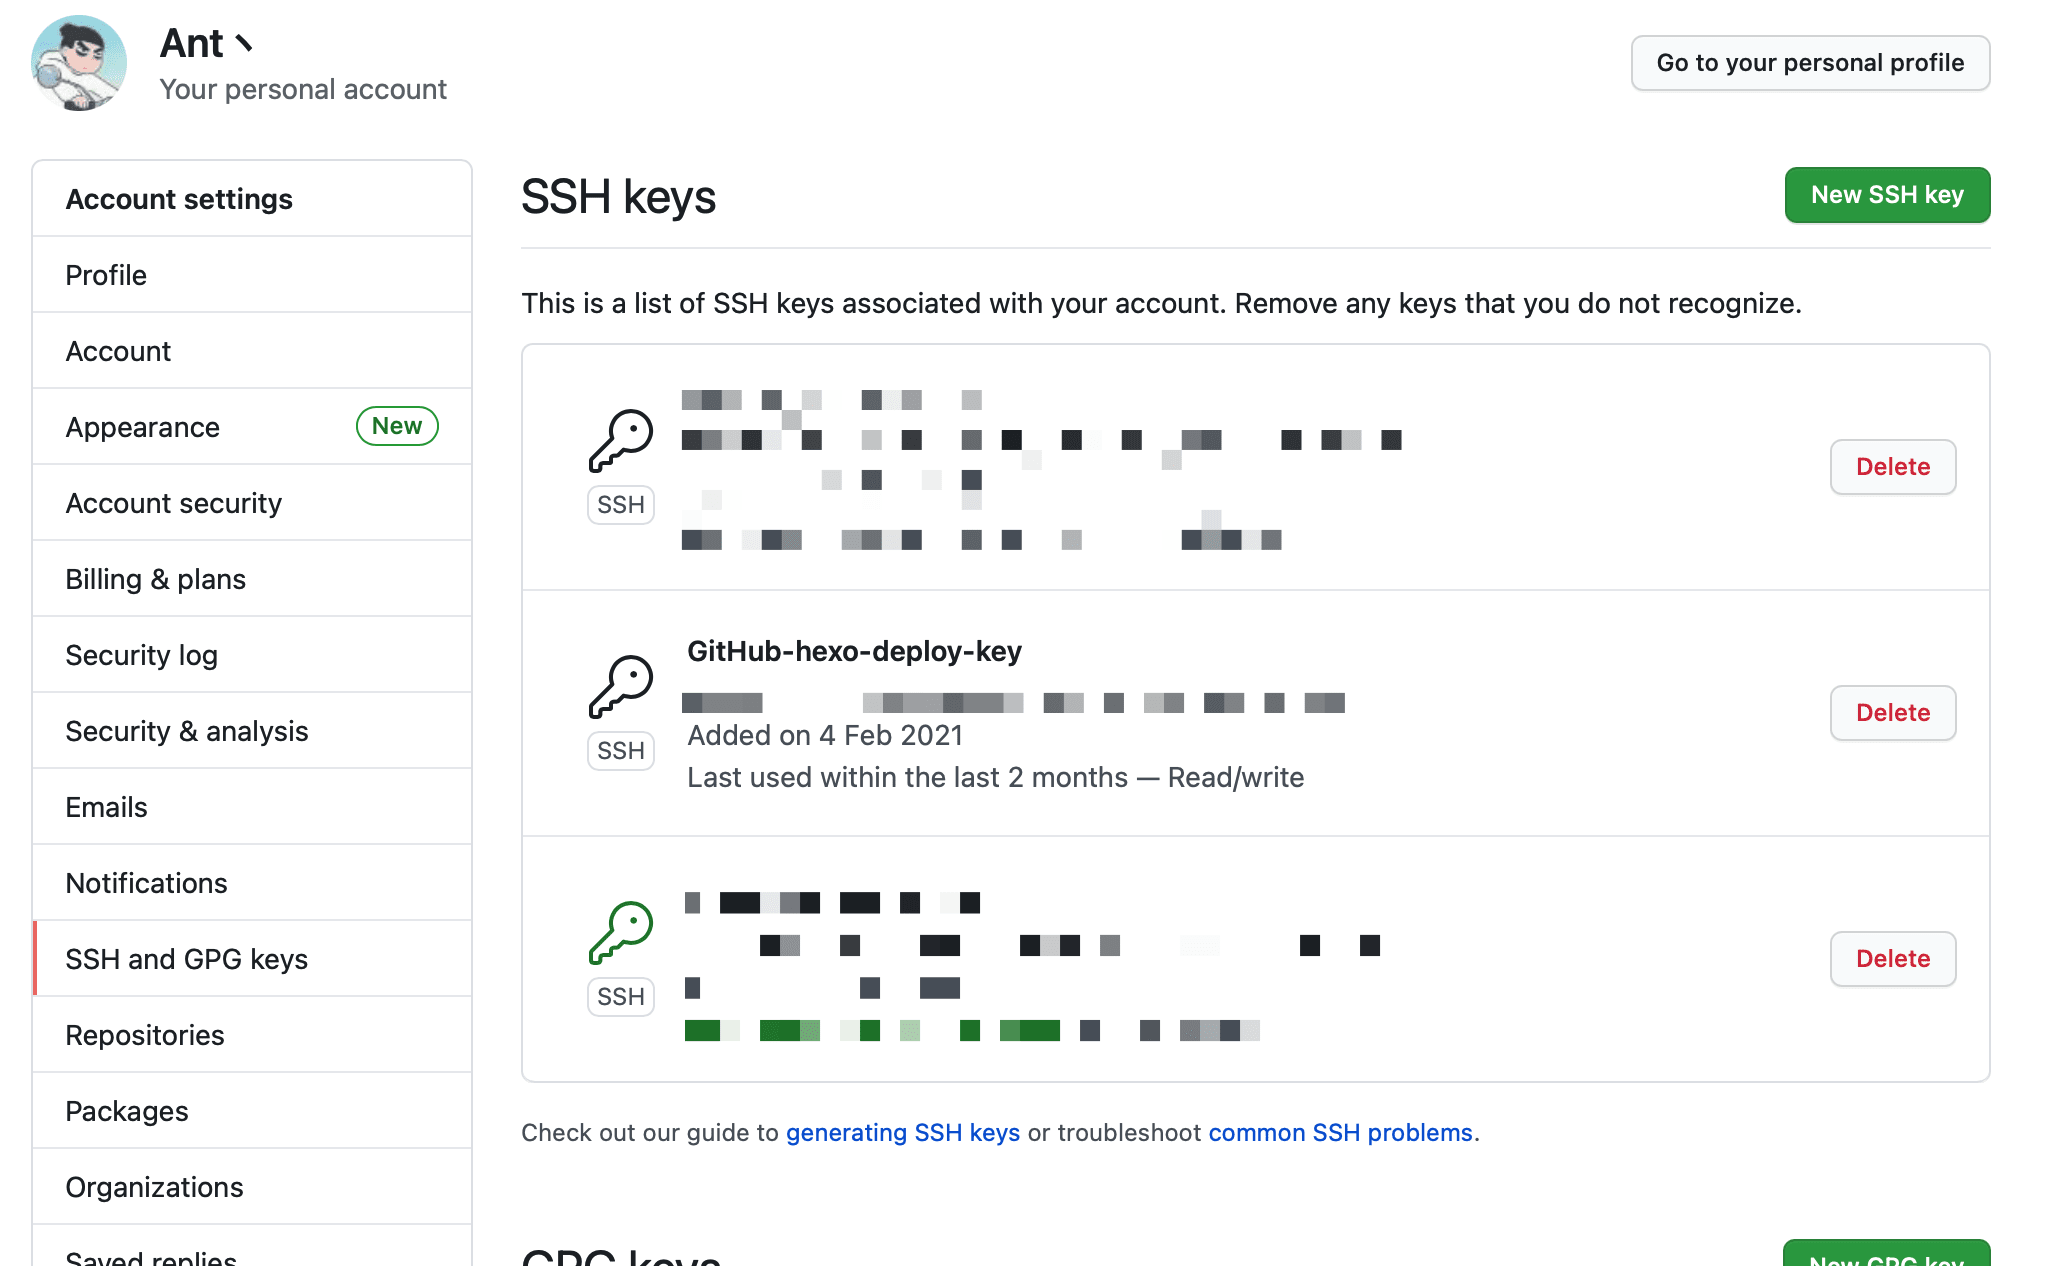
在个GitHub个人设置页 - SSH and GPG keys - SSH Keys栏目
添加hexo部署专属公钥
在对应仓库的设置 - Secrets 栏目添加一个密钥
设置完ssh-key之后,相关的使用可参考上文的部署脚本。
主题二次开发 虽然Stellar已经提供了强大的Wiki系统等功能,但也难免需要一些定制化的需求。
个人动态页 这部分参考添加一个动态页面
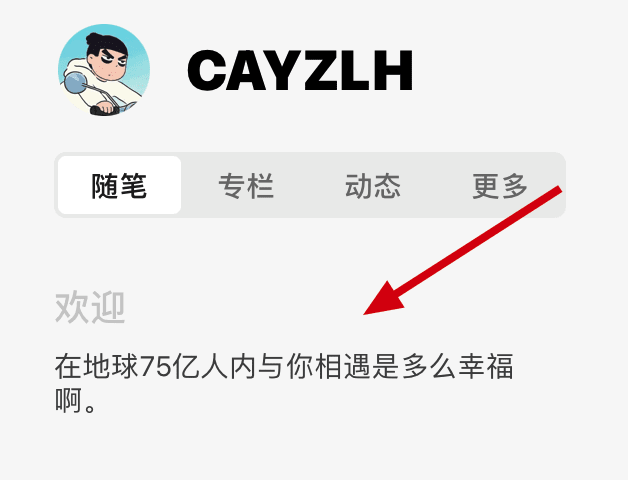
使用”一言”作为欢迎语 使用一言API 随机获取一句台词作为欢迎语:
点击查看操作步骤 文件路径:stellar/layout/_partial/sidebar/widgets/markdown.ejs
修改后内容如下:
stellar/layout/_partial/sidebar/widgets/markdown.ejs <div class='widget-wrap' id='markdown'> <div class='widget-header h4 dis-select'> <span class='name'><%- item.title %></span> </div> <div class='widget-body fs14'> <% (item.content||[]).forEach(function(row){ %> <%- markdown(row) %> <% }) %> </div> </div> <% if (theme.sidebar.widgets.hitokoto.enable) { %> <script src="https://v1.hitokoto.cn/?encode=js&select=%23hitokoto" defer></script> <% } %>
在sidebar配置项添加以下内容
添加是否开启一言API 的开关 配置项添加或修改原[欢迎 ]部分的配置 **_config.yml** sidebar: widgets: hitokoto: enable: true welcome: layout: markdown title: 欢迎 content: - '<p id="hitokoto"> </p>'
原理很简单,就是一言api会将id为hitokoto的p标签 内容修改为随机的一句台词。
个性化页脚 起初是因为国内备案需要在页脚挂备案号,于是去研究页脚的代码,发现挺简单的,顺便添加了一些别的东西比如网站运行时间等。
比较简单,直接贴代码了。
点击查看footer.ejs源码 stellar/layout/_partial/main/footer.ejs <% const author = '[@' + config.author + '](' + config.url + config.root + ')'; const using = '[' + stellar_info('name') + '](' + stellar_info('tree') + ')'; const source = theme.footer.source; const icp = theme.footer.icp; const server = theme.footer.server; function layoutDiv() { var wrapper = ''; wrapper += '<footer class="page-footer fs12"><hr><div>'; if (theme.footer.license) { wrapper += markdown(__('footer.license', theme.footer.license)); } // if (theme.footer.using) { // if (source) { // wrapper += markdown(__('footer.info_open_source', author, using, source)); // } else { // wrapper += markdown(__('footer.info_not_open_source', author, using)); // } // } if (icp) { wrapper += markdown(__('footer.server_icp', author, server, icp)); } else { wrapper += markdown(__('footer.server_not_icp', author, server)); } if (theme.footer.up_time) { wrapper += '<div><span id="timeDate">载入天数...</span><span id="times">载入时分秒...</span>'; // if (theme.footer.busuanzi.enable) { // wrapper += ',<span id="busuanzi_container_site_pv">总访问量: <span id="busuanzi_value_site_pv"></span>次</span>'; // wrapper += ',<span id="busuanzi_container_site_uv">访客数: <span id="busuanzi_value_site_uv"></span>人</span>'; // } wrapper += '</div>' } if (theme.footer.travelling) { wrapper += markdown(theme.footer.travelling); } wrapper += '</div></footer>'; return wrapper; } %> <%- layoutDiv() %> <script async src="//busuanzi.ibruce.info/busuanzi/2.3/busuanzi.pure.mini.js"></script> <script> function createtime() { var now = new Date(); var grt= new Date("05/26/2019 04:40:00"); now.setTime(now.getTime()+250); days = (now - grt ) / 1000 / 60 / 60 / 24; dnum = Math.floor(days); hours = (now - grt ) / 1000 / 60 / 60 - (24 * dnum); hnum = Math.floor(hours); if(String(hnum).length ==1 ){hnum = "0" + hnum;} minutes = (now - grt ) / 1000 /60 - (24 * 60 * dnum) - (60 * hnum); mnum = Math.floor(minutes); if(String(mnum).length ==1 ){mnum = "0" + mnum;} seconds = (now - grt ) / 1000 - (24 * 60 * 60 * dnum) - (60 * 60 * hnum) - (60 * mnum); snum = Math.round(seconds); if(String(snum).length ==1 ){snum = "0" + snum;} document.getElementById("timeDate").innerHTML = "本站已运行 "+dnum+" 天 "; document.getElementById("times").innerHTML = hnum + " 小时 " + mnum + " 分 " + snum + " 秒"; }; setInterval("createtime()",250); </script>
点击查看主题配置文件 主题配置文件_config.yml footer: social: - icon: '<img src="https://cdn.jsdelivr.net/gh/cdn-x/placeholder@1.0.1/social/08a41b181ce68.svg"/>' url: https://github.com/cayzlh - icon: '<img src="https://cdn.jsdelivr.net/gh/cdn-x/placeholder@1.0.1/social/942ebbf1a4b91.svg"/>' url: https://telegram.me/Q2F5emxo license: '[CC BY-NC-SA 4.0](https://creativecommons.org/licenses/by-nc-sa/4.0/)' using: true source: server: '[云开发CloudBase](https://cloudbase.net) & [Vercel](https://vercel.com/cayzlh/cayzlh/settings/domains)' travelling: '[<img src="https://travellings.link/assets/logo.gif" alt="开往-友链接力" width="100">](https://travellings.link)' up_time: enable: true busuanzi: enable: true
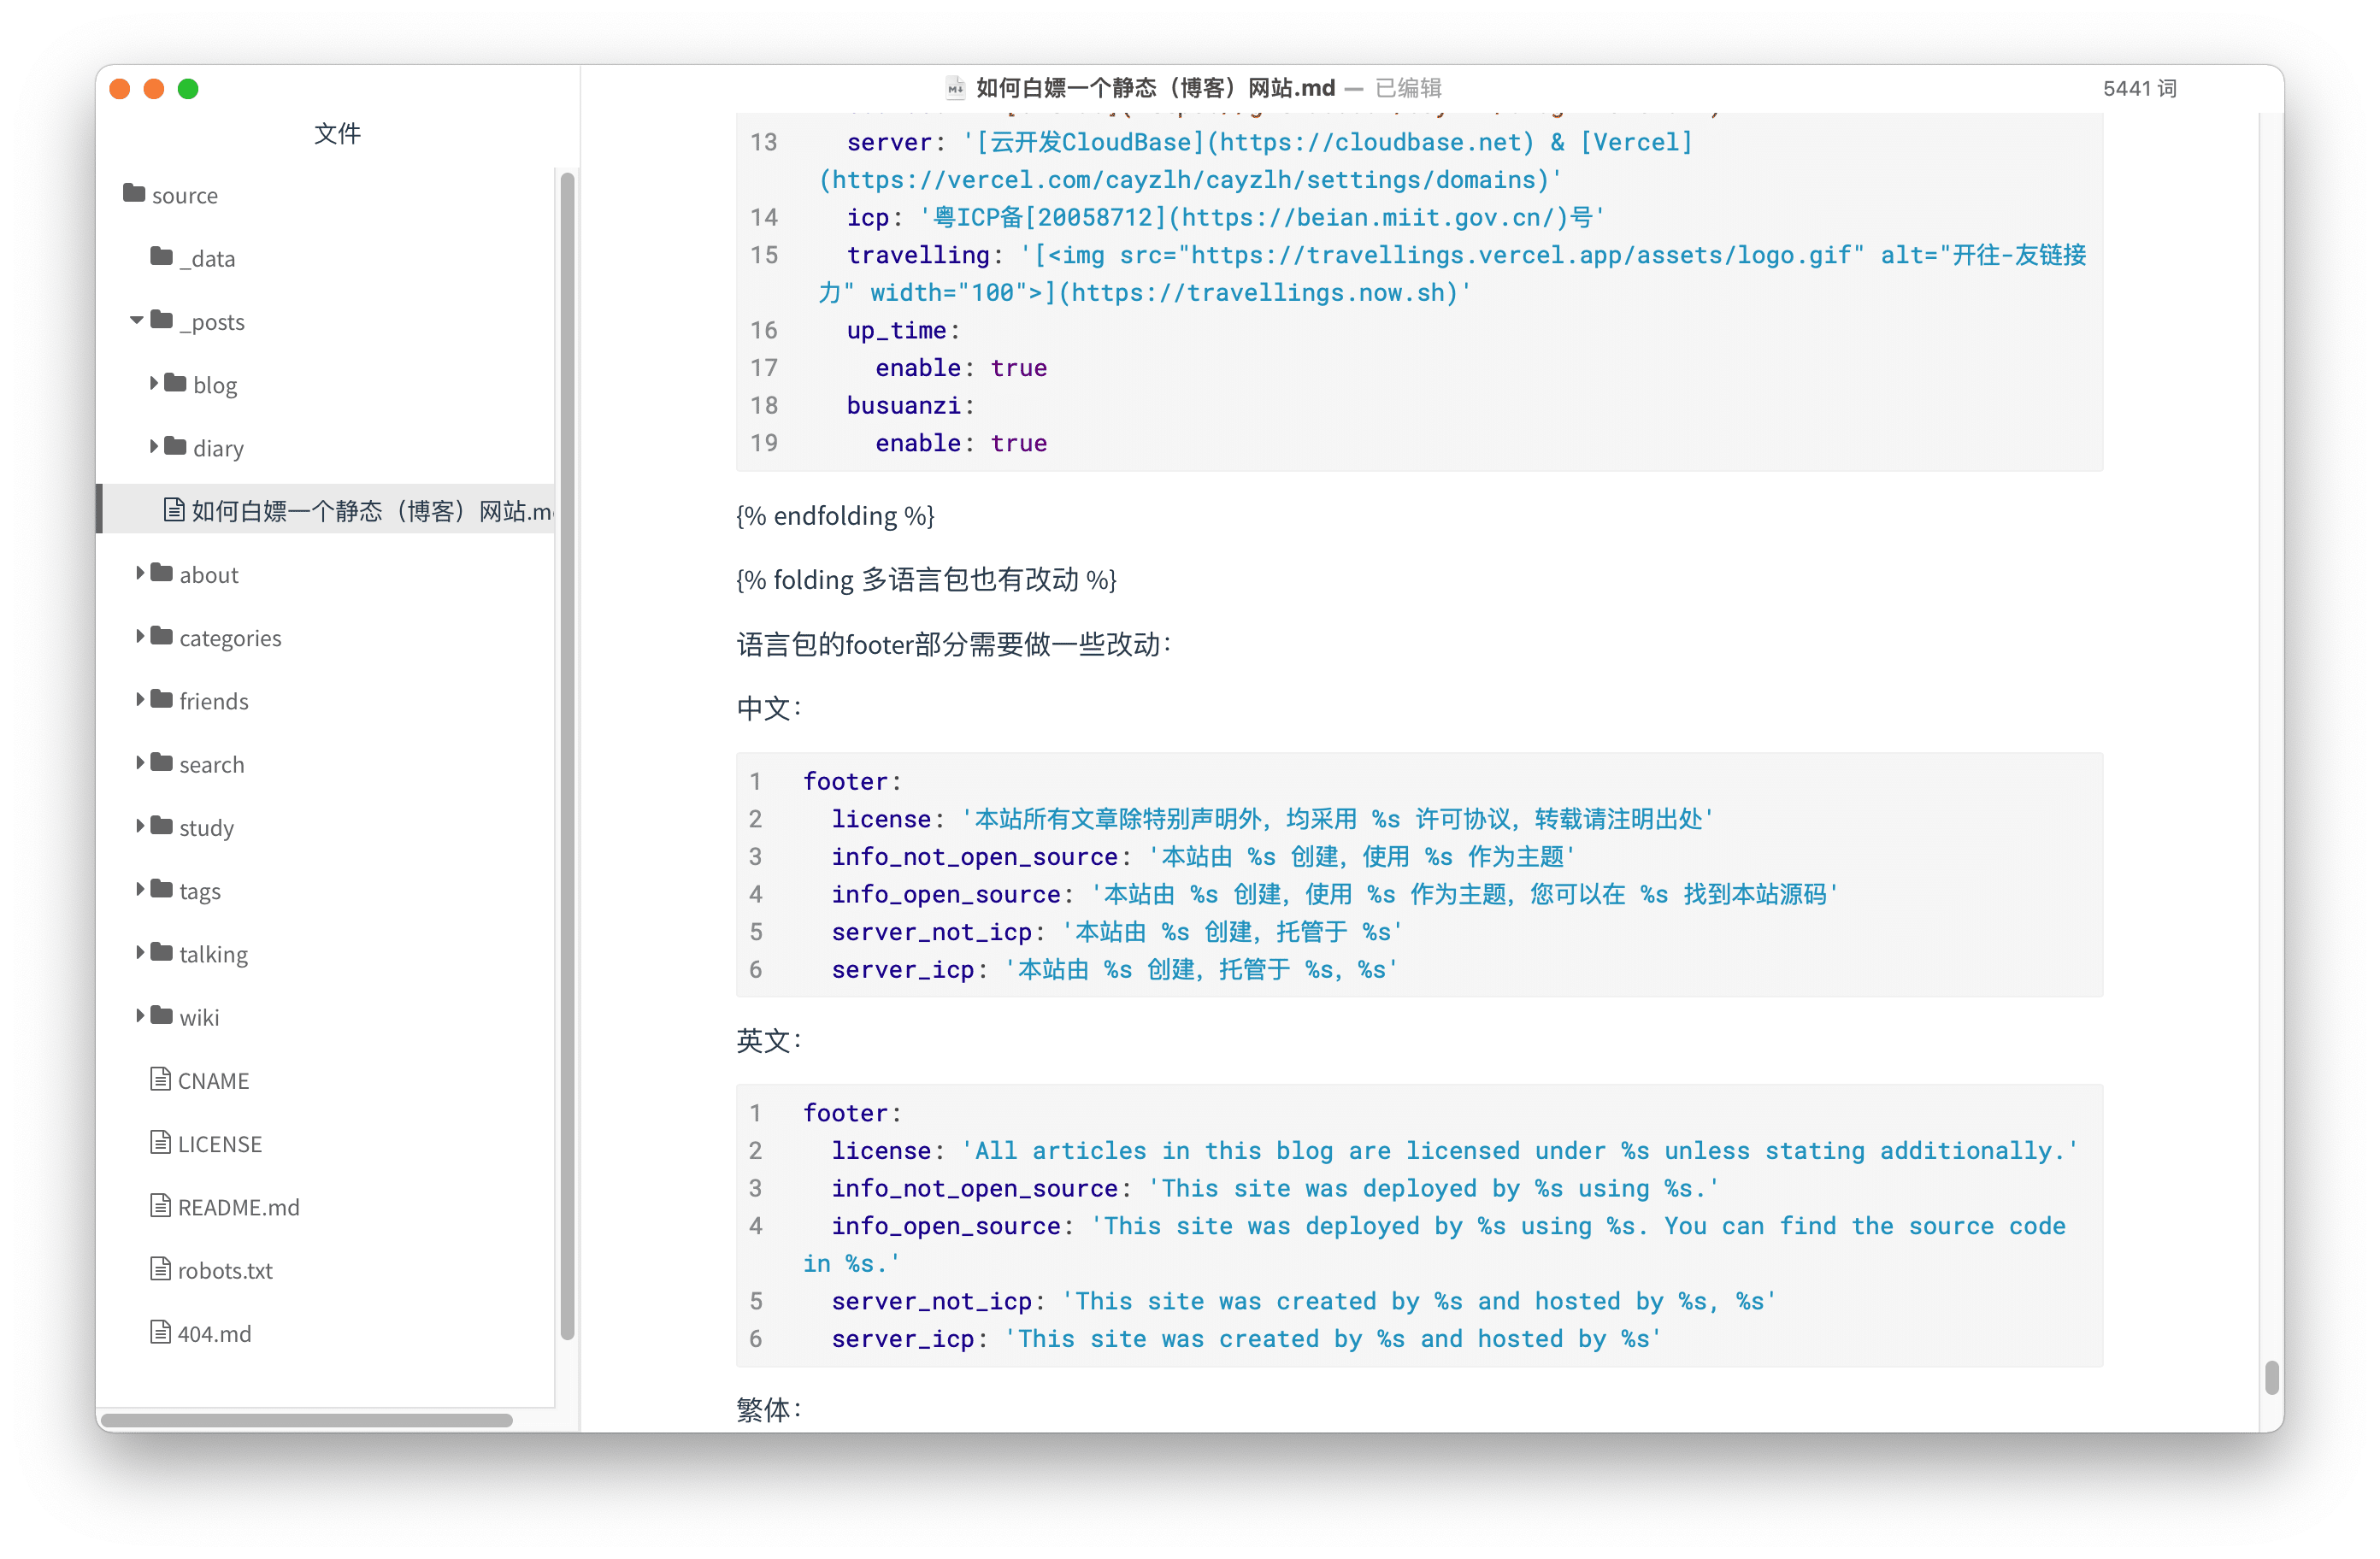
多语言包也有改动 语言包的footer部分需要做一些改动:
中文:
stellar/languages/zh-CN.yml footer: license: '本站所有文章除特别声明外,均采用 %s 许可协议,转载请注明出处' info_not_open_source: '本站由 %s 创建,使用 %s 作为主题' info_open_source: '本站由 %s 创建,使用 %s 作为主题,您可以在 %s 找到本站源码' server_not_icp: '本站由 %s 创建,托管于 %s' server_icp: '本站由 %s 创建,托管于 %s,%s'
英文:
stellar/languages/en.yml footer: license: 'All articles in this blog are licensed under %s unless stating additionally.' info_not_open_source: 'This site was deployed by %s using %s.' info_open_source: 'This site was deployed by %s using %s. You can find the source code in %s.' server_not_icp: 'This site was created by %s and hosted by %s, %s' server_icp: 'This site was created by %s and hosted by %s'
繁体:
yaml stellar/languages/zh-TW.yml footer: license: '本網誌所有文章除特別聲明外,均採用 %s 許可協議,轉載請註明出處。' info_not_open_source: '本站由 %s 創建,使用 %s 作為主題。' info_open_source: '本站由 %s 創建,使用 %s 作為主題,您可以在 %s 找到本站源碼。' server_not_icp: '本站由 %s 创建,托管于 %s' server_icp: '本站由 %s 创建,托管于 %s,%s'
嗯,最好都修改一下,防止构建报错。
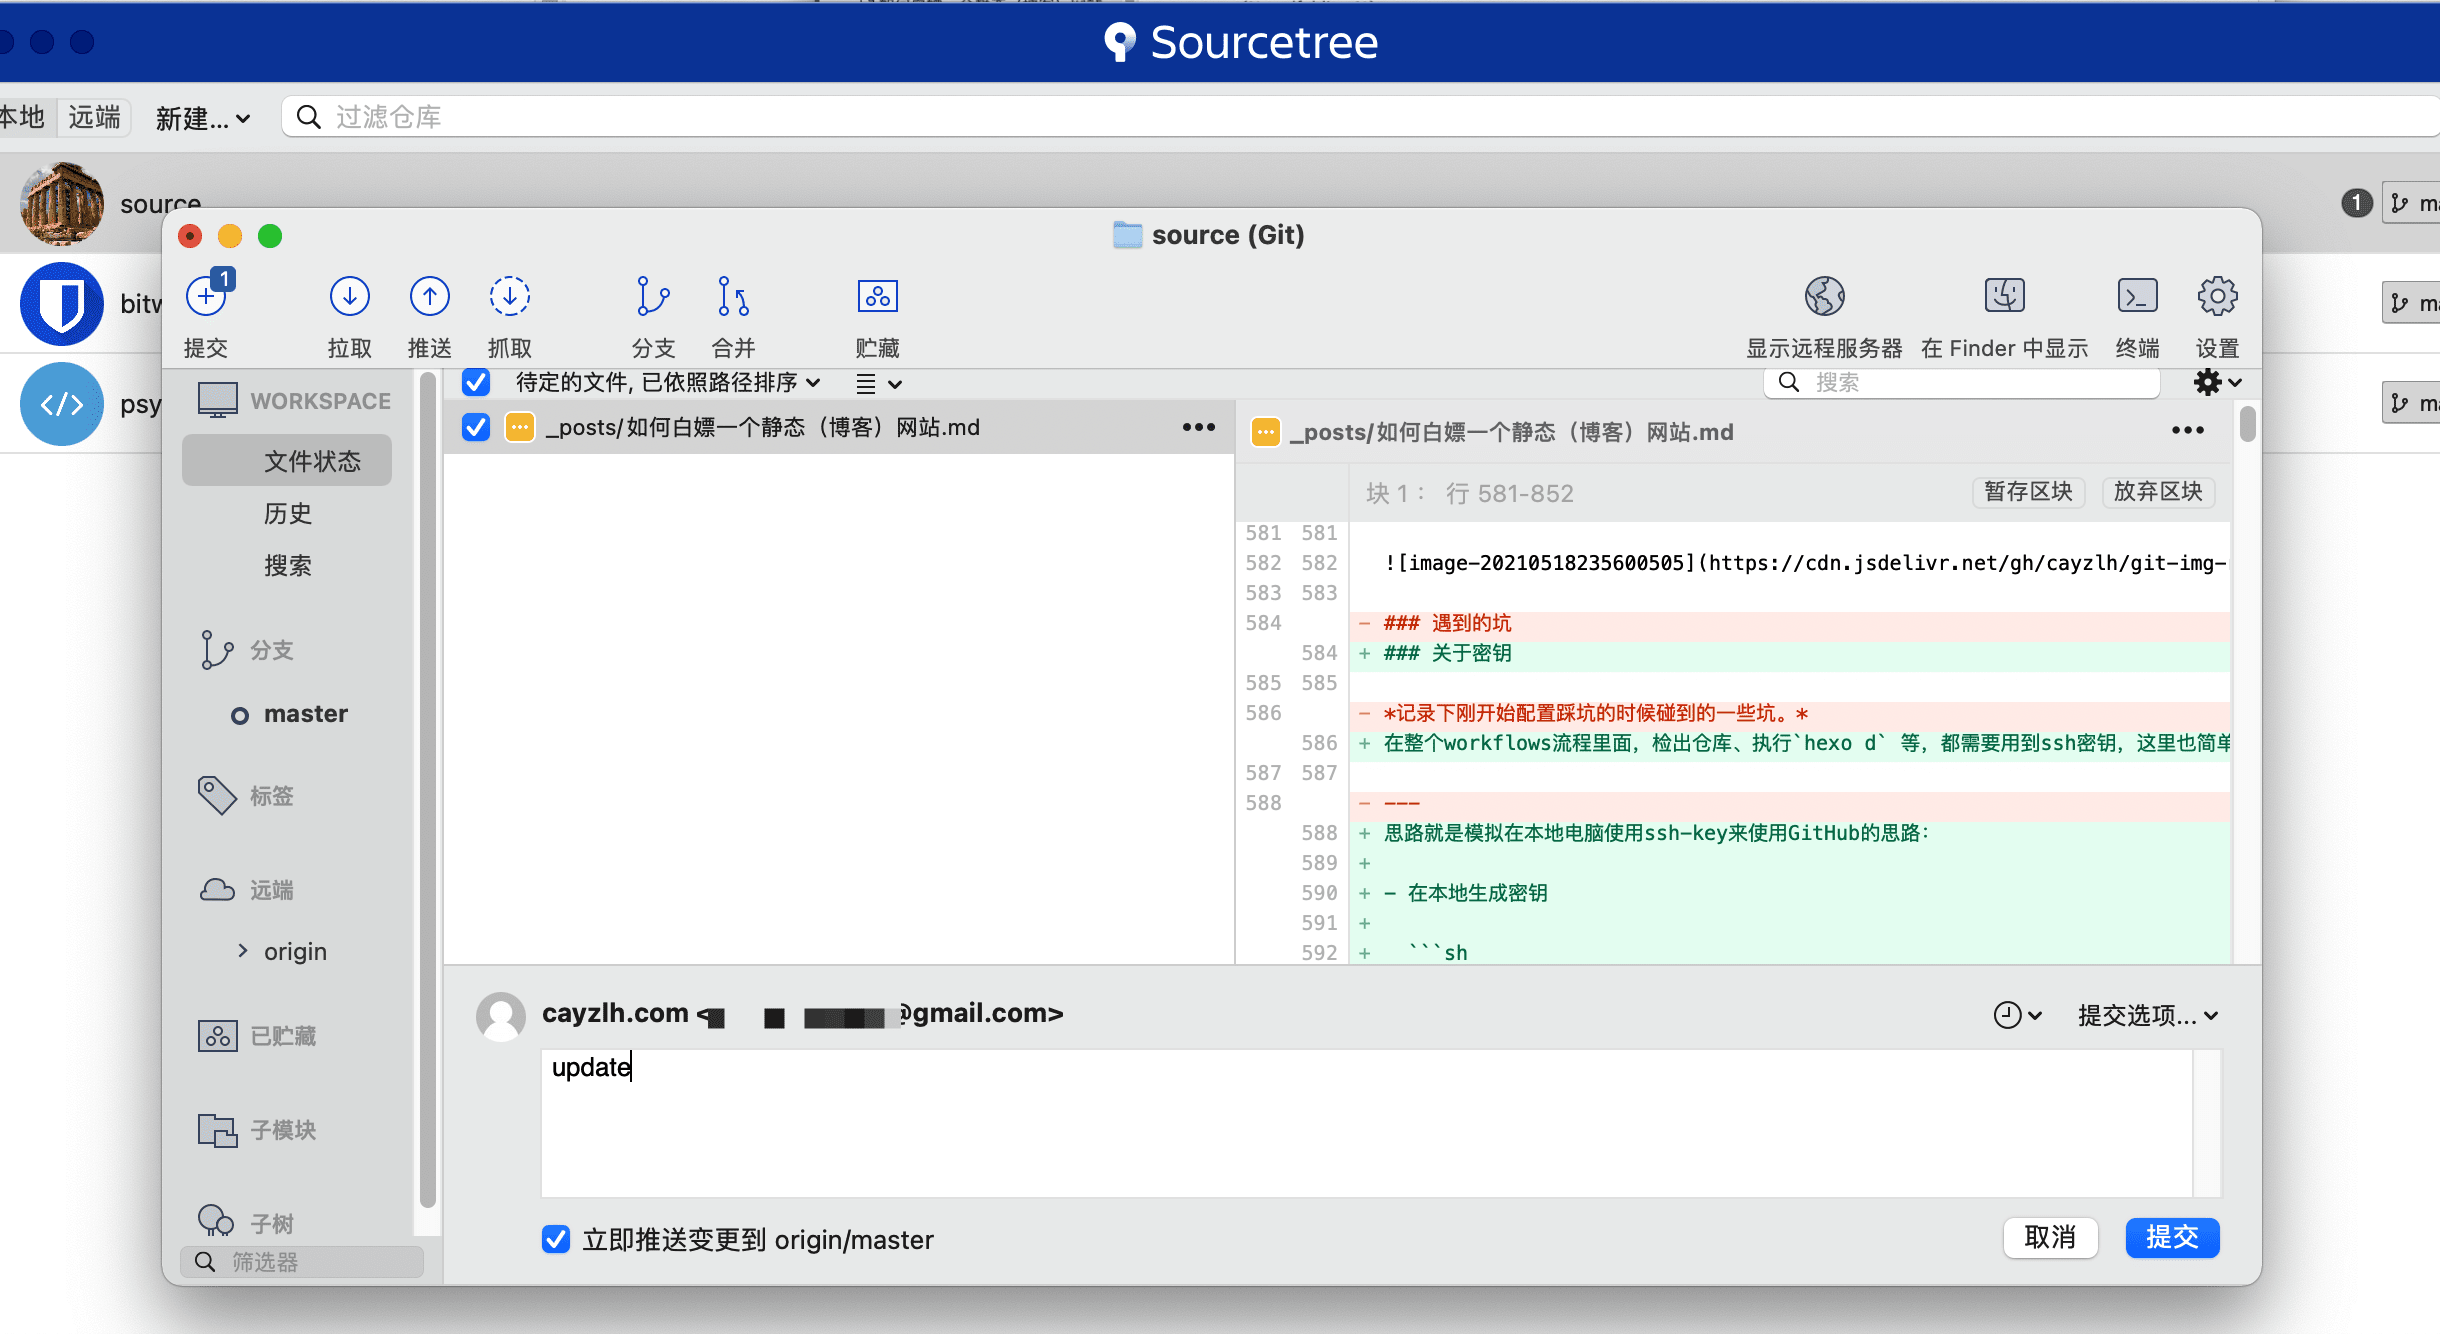
小结 日常写作流程 :
通过typora打开source目录 -> 编写文字 -> 码完字之后用 sourcetree 推送到GitHub -> Github Actions 自动部署
通过以上一顿操作下来,除了域名之外其他资源基本白嫖。
PS:
Stellar是个非常适合我的主题,用它来管理技术博客、记录生活琐事。内置的WIKI系统用来管理读书笔记、代码片段、开源文档、技术专栏等。后续还有想要记录下来的内容再继续更新。