在 XmlBeanDefinitionReader.doLoadDocument() 方法中做了两件事情,一是调用 getValidationModeForResource() 获取 XML 的验证模式,二是调用 DocumentLoader.loadDocument() 获取 Document 对象。上篇博客已经分析了获取 XML 验证模式(IOC 之 获取验证模型),这篇我们分析获取 Document 对象。
DocumentLoader
获取 Document 的策略由接口 DocumentLoader 定义,如下:
public interface DocumentLoader { |
DocumentLoader 中只有一个方法
loadDocument() ,该方法接收五个参数:
- inputSource:加载 Document 的 Resource 源
- entityResolver:解析文件的解析器
- errorHandler:处理加载 Document 对象的过程的错误
- validationMode:验证模式
- namespaceAware:命名空间支持。
如果要提供对 XML 名称空间的支持,则为true 该方法由 DocumentLoader 的默认实现类 DefaultDocumentLoader 实现,如下:
public Document loadDocument(InputSource inputSource, |
首先调用
createDocumentBuilderFactory() 创建 DocumentBuilderFactory ,再通过该 factory 创建 DocumentBuilder,最后解析 InputSource 返回 Document 对象。
EntityResolver
loadDocument() 获取 Document 对象时,有一个参数 entityResolver ,该参数是通过 getEntityResolver() 获取的。
getEntityResolver()返回指定的解析器,如果没有指定,则构造一个未指定的默认解析器。
protected EntityResolver getEntityResolver() { |
- 如果 ResourceLoader 不为 null,则根据指定的 ResourceLoader 创建一个 ResourceEntityResolver。
- 如果 ResourceLoader 为null,则创建 一个 DelegatingEntityResolver,该 Resolver 委托给默认的 BeansDtdResolver 和 PluggableSchemaResolver 。
涉及子类
- ResourceEntityResolver:继承自 EntityResolver ,通过 ResourceLoader 来解析实体的引用。
- DelegatingEntityResolver:EntityResolver 的实现,分别代理了 dtd 的 BeansDtdResolver 和 xml schemas 的 PluggableSchemaResolver。
- BeansDtdResolver : spring bean dtd 解析器。EntityResolver 的实现,用来从 classpath 或者 jar 文件加载 dtd。
- PluggableSchemaResolver:使用一系列 Map 文件将 schema url 解析到本地 classpath 资源
getEntityResolver() 返回 EntityResolver ,那这个 EntityResolver 到底是什么呢?
If a SAX application needs to implement customized handling for external entities, it must implement this interface and register an instance with the SAX driver using the setEntityResolver method.
就是说:如果 SAX 应用程序需要实现自定义处理外部实体,则必须实现此接口并使用setEntityResolver()向 SAX 驱动器注册一个实例。 如下:
public class MyResolver implements EntityResolver { |
我们首先将
spring-student.xml 文件中的 XSD 声明的地址改掉,如下:
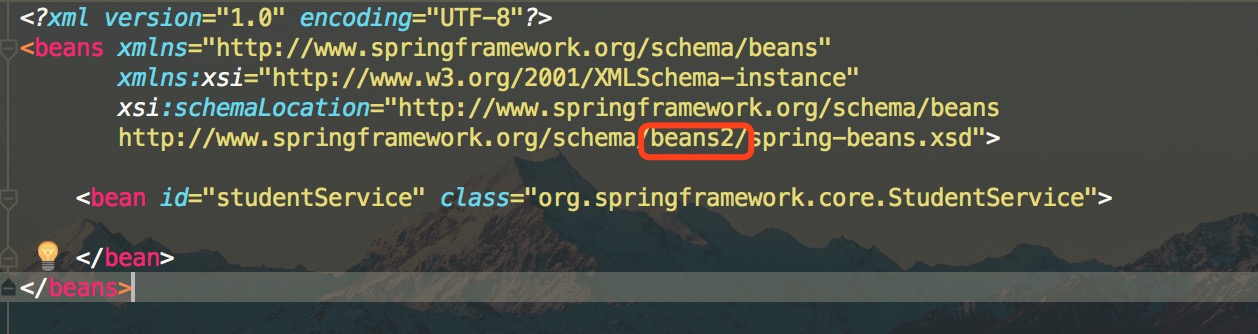
如果我们再次运行,则会报如下错误:

从上面的错误可以看到,是在进行文档验证时,无法根据声明找到 XSD 验证文件而导致无法进行 XML 文件验证。在(IOC 之 获取验证模型)中讲到,如果要解析一个 XML 文件,SAX 首先会读取该 XML 文档上的声明,然后根据声明去寻找相应的 DTD 定义,以便对文档进行验证。默认的加载规则是通过网络方式下载验证文件,而在实际生产环境中我们会遇到网络中断或者不可用状态,那么就应用就会因为无法下载验证文件而报错。
EntityResolver 的作用就是应用本身可以提供一个如何寻找验证文件的方法,即自定义实现。 接口声明如下:
public interface EntityResolver { |
接口方法接收两个参数 publicId 和 systemId,并返回 InputSource 对象。两个参数声明如下:
publicId:被引用的外部实体的公共标识符,如果没有提供,则返回null
systemId:被引用的外部实体的系统标识符 这两个参数的实际内容和具体的验证模式有关系。如下
XSD 验证模式
- publicId:null
- systemId:http://www.springframework.org/schema/beans/spring-beans.xsd
DTD 验证模式
- publicId:-//SPRING//DTD BEAN 2.0//EN
systemId:http://www.springframework.org/dtd/spring-beans.dtd 如下:

我们知道在 Spring 中使用 DelegatingEntityResolver 为 EntityResolver 的实现类,resolveEntity() 实现如下:
public InputSource resolveEntity(String publicId, |
不同的验证模式使用不同的解析器解析,如果是 DTD 验证模式则使用 BeansDtdResolver 来进行解析,如果是 XSD 则使用 PluggableSchemaResolver 来进行解析。 BeansDtdResolver 的解析过程如下:
public InputSource resolveEntity(String publicId, |
从上面的代码中我们可以看到加载 DTD 类型的
BeansDtdResolver.resolveEntity() 只是对 systemId 进行了简单的校验(从最后一个 / 开始,内容中是否包含 spring-beans),然后构造一个 InputSource 并设置 publicId、systemId,然后返回。 PluggableSchemaResolver 的解析过程如下:
public InputSource resolveEntity(String publicId, |
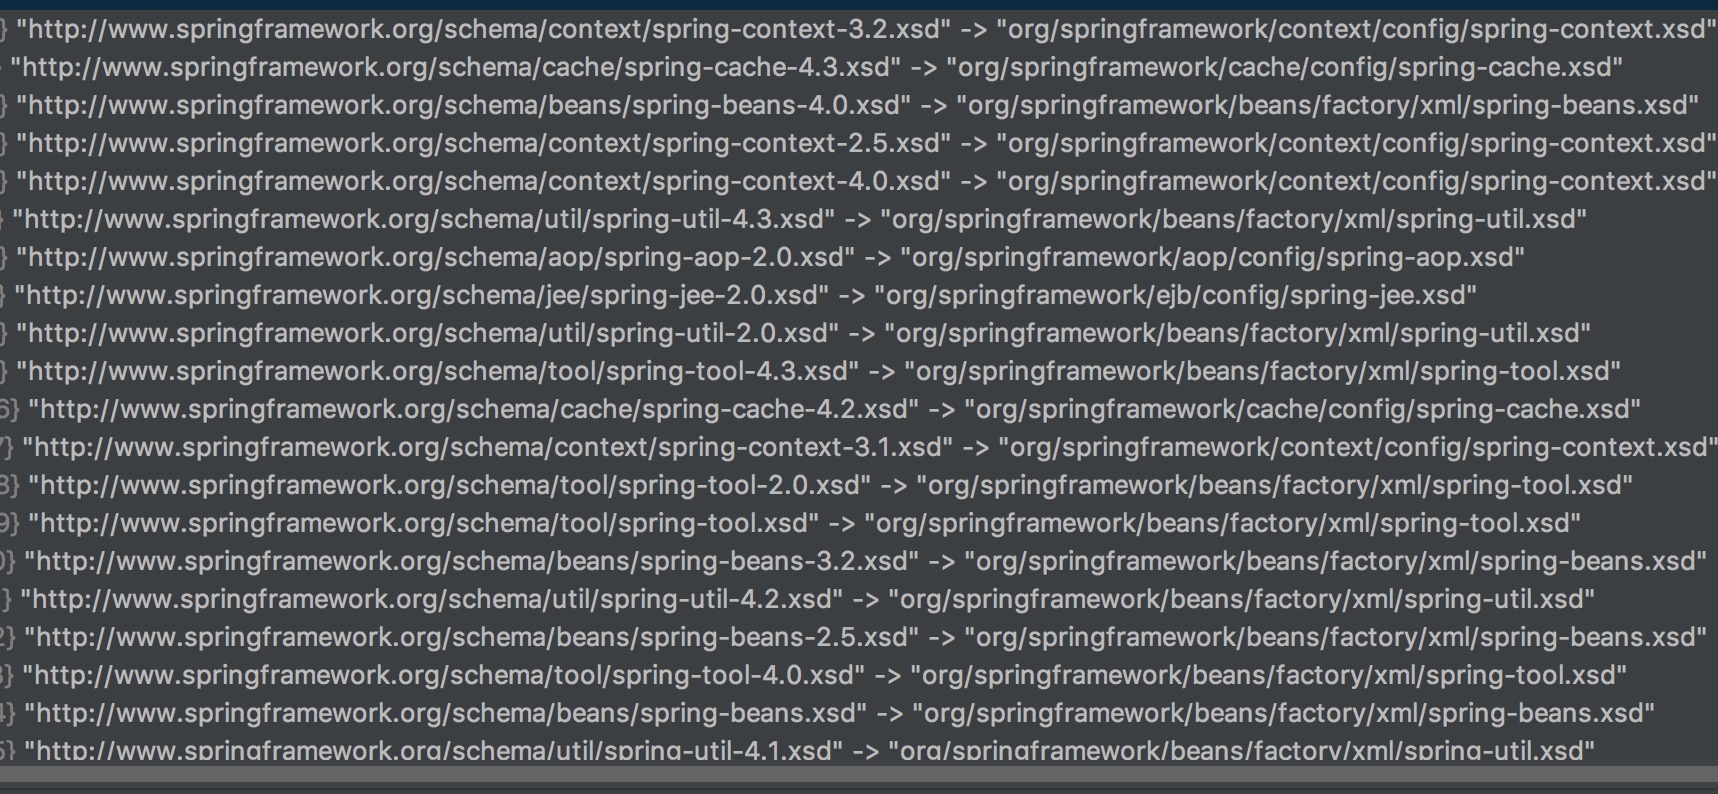
首先调用 getSchemaMappings() 获取一个映射表(systemId 与其在本地的对照关系),然后根据传入的 systemId 获取该 systemId 在本地的路径 resourceLocation,最后根据 resourceLocation 构造 InputSource 对象。 映射表如下(部分):